Top 5 Ways to Transfer Photos from iPhone to Mac
 Jerry Cook
- Updated on 2021-08-04 to Transfer File
If you are using an iPhone, then you are already blessed with a professional-quality camera that you can use to capture some amazing pictures wherever you are. But as the collection of images grow in your iPhone, you may notice that photos eat up most of the storage of your iPhone.
So, you may need to offload some photos from time to time. Thus, transferring photos from iPhone to Mac can literally help you save a lot of storage space on your device. In this article we will write all the possible ways on how to import photos from iPhone to Mac with or without iTunes.
- Way 1. One-click to Transfer Photos from iPhone to Mac without iTunes or iPhoto
- Way 2. How to Import Photos from iPhone to Mac using Photos App
- Way 3. How to Get Photos from iPhone to Mac using Image Capture
- Way 4. How to Upload Photos from iPhone to Mac using Airdrop
- Way 5. Sync Photos from iPhone to Mac using iCloud
Way 1. One-click to Transfer Photos from iPhone to Mac without iTunes or iPhoto
The best and quickiest way to get photos from iPhone to Mac is by using a professional iPhone photos transfer tool like UltFone iOS Data Manager. This software will work as a one-stop solution to manage and transfer your iPhone data to computer or vice versa.
UltFone iOS Data Manager offers some flexible options in order to move photos from iPhone to Mac. So, either you can go with one-click way to export iPhone photos to Mac or selectively transfer photos to Mac. Here are some of the attractive features of UltFone iOS Data Manager:
- One-click to export iPhone photos to Mac or PC.
- Manage iPhone photos on computer, so you can delete, import or export photos without iTunes syncing.
- In addition, it supports other types of data like music, messages, books, contacts, etc.
- Back up iPhone to computer for free, allowing users to viewing backup data and selectively restoring data from backup.
- Transfer iTunes media to iPhone or vice versa without syncing.
- Fix iOS system issues without data loss.
- Works for all iOS devices and iOS/iPadOS versions.
How to Transfer Photos from iPhone to Mac with UltFone iOS Data Manager
Let’s say how this software is helpful to move pictures from iPhone to Mac.
Option 1. One Click to Export iPhone Photos to Mac
Just connect your iPhone to Mac and launch this software. Choose “One-Click to Export Photos to Mac” from the main interface.
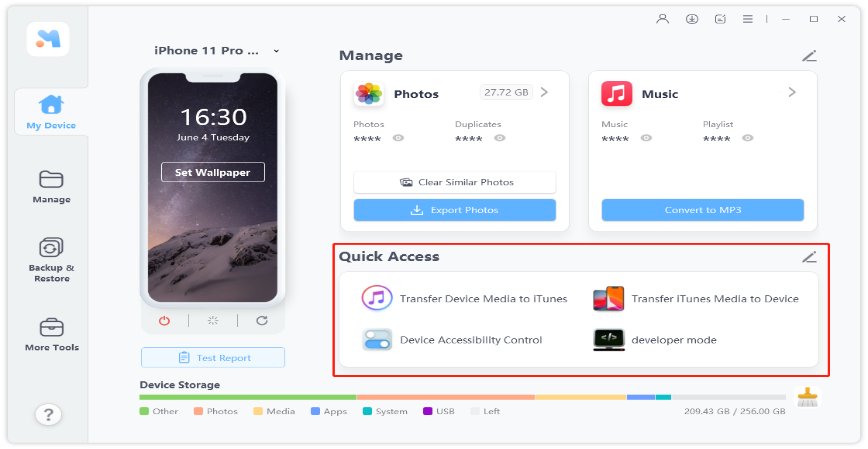
Wait for the photos to transfer complete.
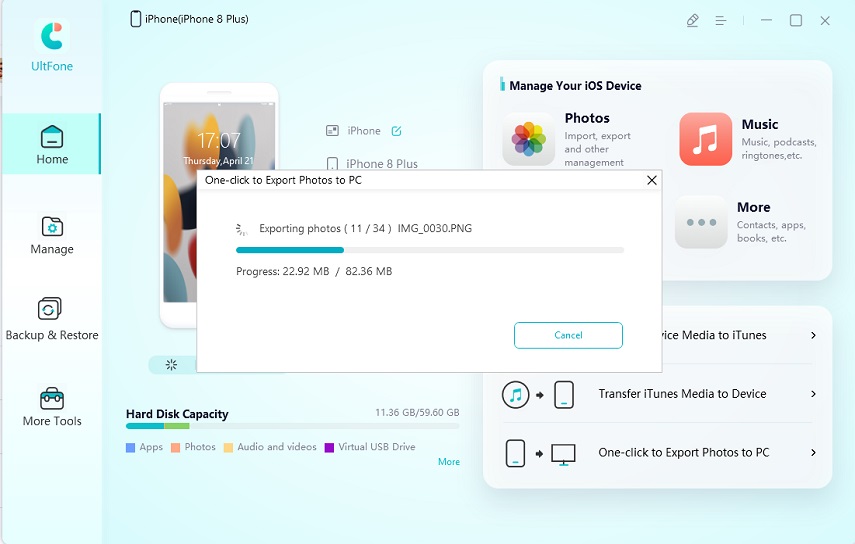
This one-click way will transfer all photos in a time. If you’d like to selectively move photos, you can use the Manage feature to choose photos selectively.
Option 2. Selectively Transfer iPhone Photos to Mac
Choose Manage feature on the top menu, and this software will load file on your device by categories. On the left sidebar, select the Photos category. Your iPhone photos are listed on the right panel by date. You can browse and choose the photo(s) that you want to export to Mac. Click the Export button from the menu bar, you can transfer them directly to Mac.
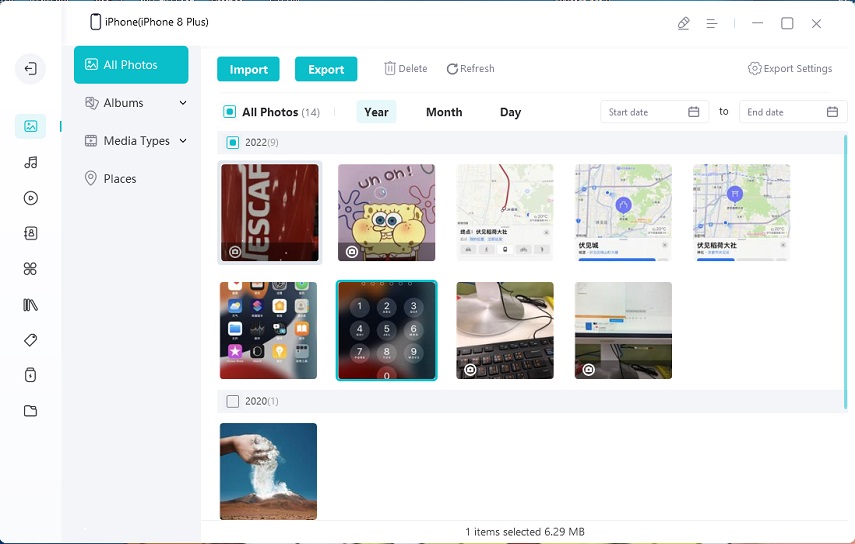
After moving the photos to Mac, you can delete them from your iPhone by pressing the Delete button in the program.
Quite easy and flexible, right? You don’t need iTunes or network to manage photos on your iPhone. Free download this iPhone to computer transfer software to have a try now.
Way 2. How to Import Photos from iPhone to Mac using Photos App
Using Photos app is one of the simplest ways to transfer pictures from iPhone to mac. Here’s what’s need to be done:
- Step 1: Connect your iPhone to the Mac with the help of a Lightening-to-USB cable.
- Step 2: The Photos app should load automatically and will display the pictures from your iPhone. However, if that doesn’t happen, choose your iPhone from the left-hand menu from the Photos app.
-
Step 2: The Photos app should load automatically and will display the pictures from your iPhone. However, if that doesn’t happen, choose your iPhone from the left-hand menu from the Photos app.

Way 3. How to Get Photos from iPhone to Mac using Image Capture
Image Capture app is another way that can help you in moving pictures from your iPhone to Mac. It is an in-built app that comes with macOS. You can follow the steps listed-below to deal with how to transfer photos from iPhone to Mac.
- Step 1: Connect your mobile to the Mac through a USB cable.
- Step 2: On your Mac, open the Image Capture app.
- Step 3: In the sidebar, under the Devices category, choose your iPhone.
- Step 4: At the bottom, click on the Import To menu to select where you want to save the pictures.
-
Step 5: Now, choose the pictures and click the Import or Import All option to import the images.

Way 4. How to Upload Photos from iPhone to Mac using Airdrop
If you want to fix the issue of how to upload photos from iPhone to mac without USB cable, then you can do it using the AirDrop feature.
- 1. To start with, make sure both your iPhone and Mac are connected to the same Wi-Fi.
-
2. Now, enable the AirDrop on your iPhone and select "Everyone" in the discovery settings.

-
3. Launch the Finder on Mac and open AirDrop. Select the "Everyone" option here, too.

After both the devices find each other, follow these steps to move photos from your iPhone to Mac via AirDrop:
- Step 1: Select the Photos app on your iPhone and choose the images you want to move.
- Step 2: Click on the Share option and wait for a moment till AirDrop finds your Mac and tap on it.
-
Step 3: On your Mac, a popup will appear asking you to accept the images. Click on the Accept option.

Way 5. Sync Photos from iPhone to Mac using iCloud
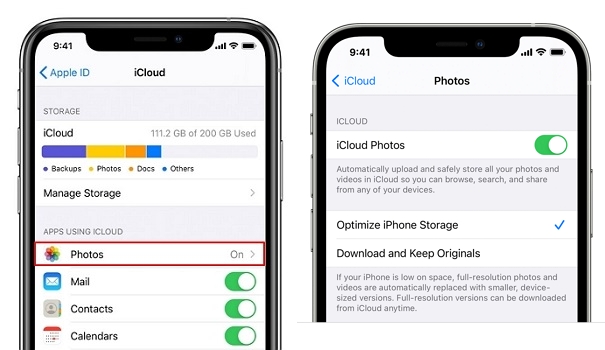
iCloud Photos is nothing but Apple’s online photo storage service. You can transfer photos from your iPhone to Mac using iCloud Photos. However, you need to set it up first. Here’s how you can set up iCloud Photo Library on your iPhone:
- Step 1: Go to the Settings app and tap on your name showing at the top.
- Step 2: Go to the iCloud option and tap on the Photos option.
-
Step 3: Switch on the “iCloud Photos” option.

Now, you are required to set up iCloud Photos on your Mac. Here’s how you can do it: Launch “Photos” app> Go to “Photos Menu” > Click on “Preferences” > Click on iCloud > Enable the iCloud Photo Library.
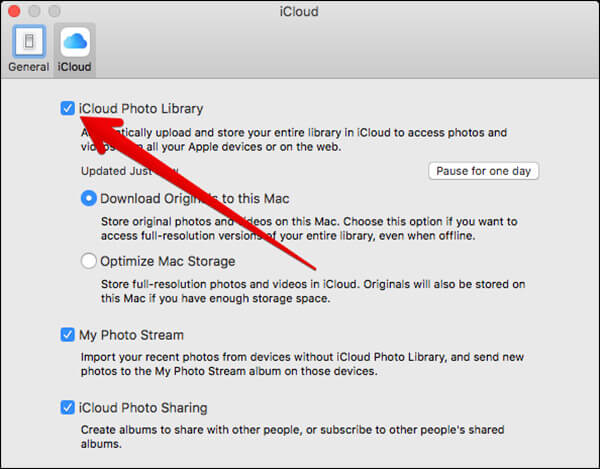
Remember that you should be signed in with the same Apple ID on both devices to automatically sync the photos between Mac and iPhone.
Wrap It Up
That’s all about how to transfer iPhone photos to Mac without iPhoto or iTunes. You can use any of the methods above to transfer pictures. However, we recommend you try your hands on UltFone iOS Data Manager. With this tool, moving pictures from iPhone to Mac becomes a hassle-free task.


