Step By Step Guide to Delete Messages on iPhone
 Jerry Cook
- Updated on 2023-08-23 to iPhone
For users who send and receive tons of messages every day will find iMessages taking up too much space on iPhone. Too many messages wouldn't only slow down iPhone performance but would also lead to many other problems. Therefore, the best approach is to remove unnecessary conversations from iPhone to free up space. There are four main ways to delete messages on iPhone. Let's look at the details on how to delete a text message on iPhone 14/13/12/11/XS/8/7.
- Part 1. How to Delete Messages on iPhone
- Part 2. How to Auto Delete Messages on iPhone
- FAQs about Deleting Messages on iPhone
Part 1. How to Delete Messages on iPhone
Delete Entire Conversation on iPhone
Deleting conversations on iPhone is incredibly easy. However, if you are unsure about the process to delete the entire conversation, then follow these steps:
- Step 1. Go to "iMessage" from your iPhone.
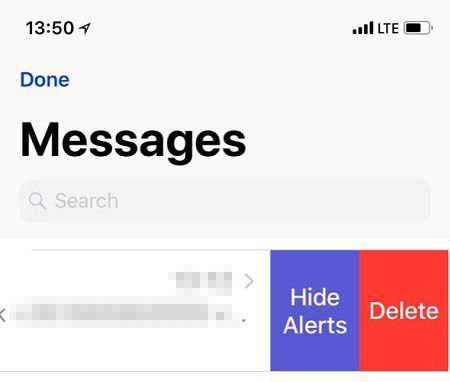
Step 2. Look for the conversation that you wish to delete. Swipe left on the conversation and tap the "Delete" button.

Delete Multiple Conversations on iPhone
The steps to delete multiple conversations on iPhone are as follows:
- Step 1. Tap the "iMessages" app to launch it.
- Step 2. Tap on the "Edit" option on the top-left corner of the screen.
- Step 3. Now, select the conversations you wish to erase from your iPhone. A check mark would appear on the selected conversations.
Step 4. After that, tap "Delete" from the lower-right corner of the screen.

Delete Individual Message on iPhone
iMessage also allows you to delete a few individual messages from a conversation while leaving the rest of the messages untouched. Follow the steps to delete individual message on iPhone.
- Step 1. Launch the Messages app from your iPhone.
- Step 2. Head to the conversation that contains messages you want to delete.
- Step 3. Tap and hold the message you want to delete until a menu pops up.
- Step 4. Now, choose More.
- Step 5. After that, tap the "trash can" icon from the screen's bottom-left corner.
Step 6. After that, tap "Delete" from the lower-right corner of the screen.

Delete Multiple Messages on iPhone
On iOS devices, you can also delete multiple messages from the conversation. To delete multiple messages from a conversation, follow the steps.
- Step 1. Launch Messages and go to the conversation with the messages you want to delete.
- Step 2. Now, choose the message and hold it until a menu pops up.
- Step 3. Now, tap "More" and select all the messages from the conversation you want to delete.
Step 4. After that, tap the "trash can" icon and tap "Delete Message" to confirm the action.

Part 2. How to Auto Delete Messages on iPhone
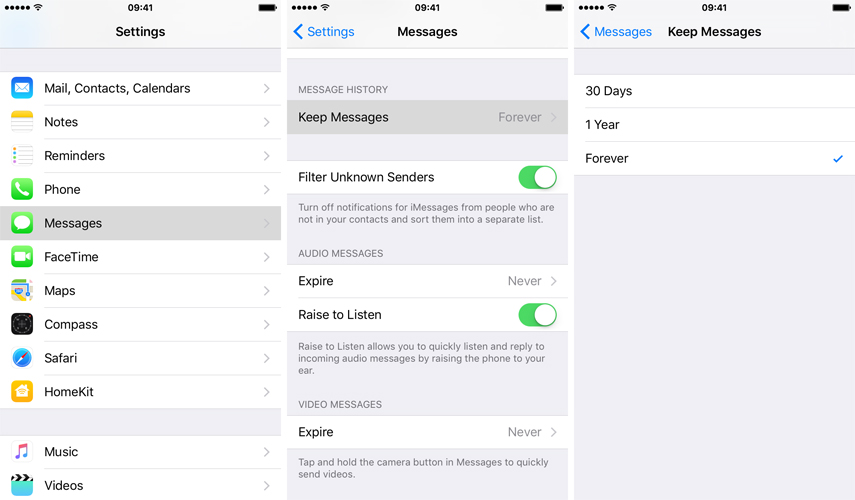
Apple has introduced the Auto-Delete feature for iOS devices. When the feature is enabled, your iPhone will automatically delete the messages after 30 days or 1 year.
- Step 1. Go to Settings from your iPhone.
- Step 2. Scroll down and tap Messages.
- Step 3. Now, tap the "Keep Messages" option.
Step 4. Choose from the options: 30 days or 1 Year.

Bonus Tip: How to Recover Deleted Text Messages on iPhone
If you have accidentally deleted text messages from your iPhone, then you can seek help from a recovery tool just like UltFone iOS Data Recovery to retrieve deleted files.
UltFone iOS Data Recovery is a powerful tool that directly recovers files from iOS devices, iTunes & iCloud backup. Moreover, it can recover 35+ file types and is compatible with the latest iOS 17. Some of the top features of UltFone iOS Data Recovery are as follows:
- Helps you recover 35+ file types.
- Selectively extract data from iTunes/iCloud backup.
- User-friendly interface.
- Support both Windows as well as Mac.
- Highest success rate.
- Trusted and recommended by TechRadar, MacWorld and many more.
Download and install UltFone iOS Data Recovery on your computer/Mac, and follow the step-by-step instructions.
- Step 1 Launch the software and connect your iPhone with the computer.
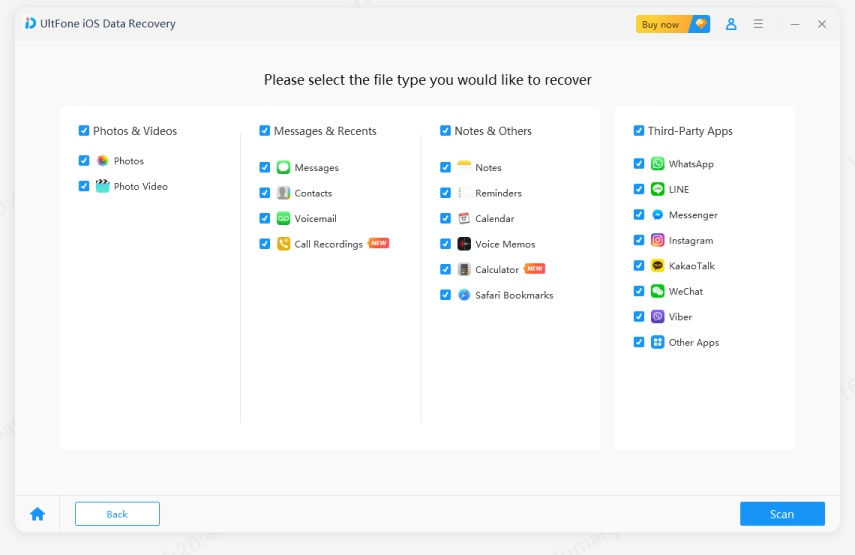
Step 2 From the main interface, choose "Recover Data from iOS Device”.

Step 3After that, tick the “Message & Attachment” box, and then click the “Scan” button.

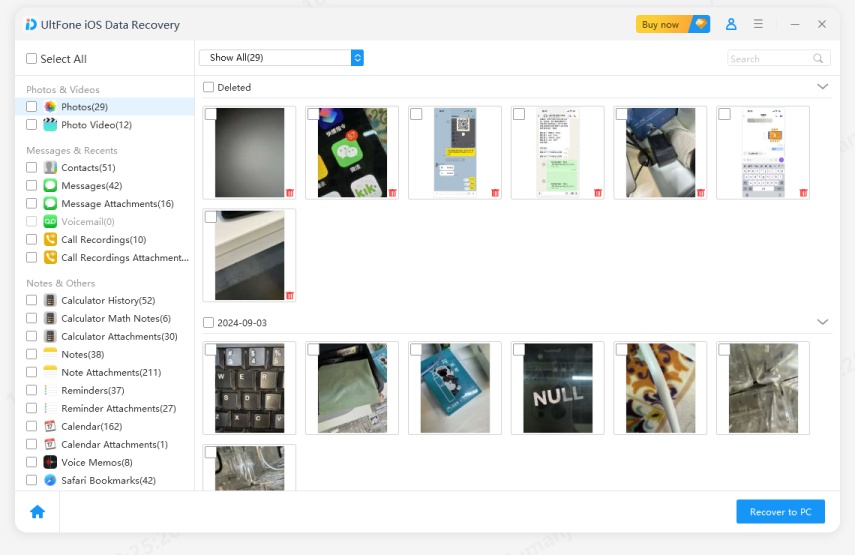
Step 4 Now, select the messages that you would like to recover back to your device, and click the “Restore to PC” button.

That’s it. It may take a few seconds to retrieve deleted text messages back to your device.
FAQs about Deleting Messages on iPhone
1. How to delete sent messages from both sides?
There is no way to delete sent messages from both sides. You can only delete the message from your device. In order to delete message from another device, you need to have access to that iPhone.
2. Is it possible to delete messages on iPhone without having the phone?
It isn't possible to delete a message on iPhone without having access to the phone.
3. How to delete messages from iCloud?
- Step 1. Go to Settings and tap iCloud.
- Step 2. Tap Manage Storage, and select Messages.
- Step 3. Now, tap on the 'Disable and Delete' option.
4. How to delete messages from iPhone but not iCloud?
You need to enable syncing with iCloud. After you have enabled syncing with iCloud, you can delete messages from your iPhone, and the messages on iCloud will remain untouched.
5. How do I delete my text messages on my Apple Watch?
- Step 1. Go to Messages from your Apple Watch.
- Step 2. Scroll to the conversation you would like to remove, and swipe left.
- Step 3. Tap the trash icon to delete the conversation.
Final Takeaway
In this article, we have shared multiple techniques to delete a message on iPhone. The methods mentioned earlier are tested and works perfectly on all iOS devices. Moreover, if you have accidentally deleted files from your iPhone, try UltFone iOS Data Recovery, as it is an excellent tool for recovering data. Also if you have any query, feel free to share with us. We will be thrilled to help you.

