6 Ways to Fix Guided Access Not Working in iOS 16 for iPhone/iPad
 Jerry Cook
- Updated on 2024-01-29 to iOS 15
Is anyone else having issues turning on Guided Access since updating to iOS 16? Doesn’t work when I triple click the side button and doesn’t work when I pull down my shortcuts and select it there.
Many users have claimed that Guided Access is not working in iOS 16. Regardless of how beneficial Guided Access is, it is not without flaws. You shouldn't be over-concerned if Guided Access triple click not working on iPhone. And you may ask “Why is my Guided access not working”or "How to Get out of Guided Access without Password". Anyone can face such a situation at any time. So, if you happen to be one of the unlucky ones, read this article.
In this article, we'll look at how to repair Guided Access not working on iPhone/iPad running iOS 16 and earlier. Hopefully, one of the techniques suggested will resolve the issue with your iPad/iPhone.
- Part 1. What is Guided Access?
- Part 2. How to Enable Guided Access?
- Part 3. How to Use Guided Access on iPhone/iPad?
- Part 4. Video Guide on How to Get Out Of Guided Access on iPhone
- Part 5. 6 Ways to Fix Guided Access Not Working in iOS 16
Part 1. What is Guided Access?
While using your iPhone, iPad, or iPod touch, Guided Access helps you stay focused on a task. Guided Access restricts your device to a single app and allows you to choose which features are available within that app. Notably, while using TD Snap or Compass, you can use Guided Access to deactivate the home button to prevent users from abandoning the software.
Part 2. How to Enable Guided Access?
- 1. Go to the “Setting” on your iPhone or iPad.
- 2. Select "Accessibility" from the menu.
- 3. Select "Guided Access" while scrolling to the bottom of the page.
- 4. Set the Guided Access toggle to "ON"(green).
- 5. Now from the drop-down list menu, select "Passcode Settings".
- 6. Create a six-digit passcode by tapping Set Guided Access Passcode. To end a Guided Access session, you'll need this passcode.
7. Retype your passcode to double-check it.

Part 3. How to Use Guided Access on iPhone/iPad?
Start the app that you want the user to have access to. We used music in this example.
- 1. To initiate Guided Access, triple-click the "Home" button on an iPhone or iPad with a home button, or triple-click the "Side" button on an iPhone or iPad with Face ID.
- 2. Make a circle around any portions of the screen that you want to be unavailable.
- 3. Choose whether or not to grant access to the Sleep/Wake button, Volume buttons, touch screen, and motion in the bottom left corner by tapping Options. To save your choices, tap "Done".
- 4. To initiate Guided Access, tap the "Start" button at the top of the screen.
Anyone attempting to quit the app you've locked using Guided Access will see a banner message instructing them to triple-click the "Home" button to exit. They won't be able to leave Guided Access if they don't know the pre-set passcode.
Part 4. Video Guide on How to Get Out Of Guided Access on iPhone
Part 5. 6 Ways to Fix Guided Access Not Working in iOS 16
- Way 1. Force Restart Your iPhone/iPad
- Way 2. Delete the Kiosk Policy
- Way 3. Set Accessibility
- Way 4. Factory Reset your iPhone
- Way 5. Restore iPhone via iTunes [Risk of Data Loss]
- Way 6. Repair iOS System to Fix Guided Access Not Working [Free of Data Loss]
Way 1. Force Restart Your iPhone/iPad
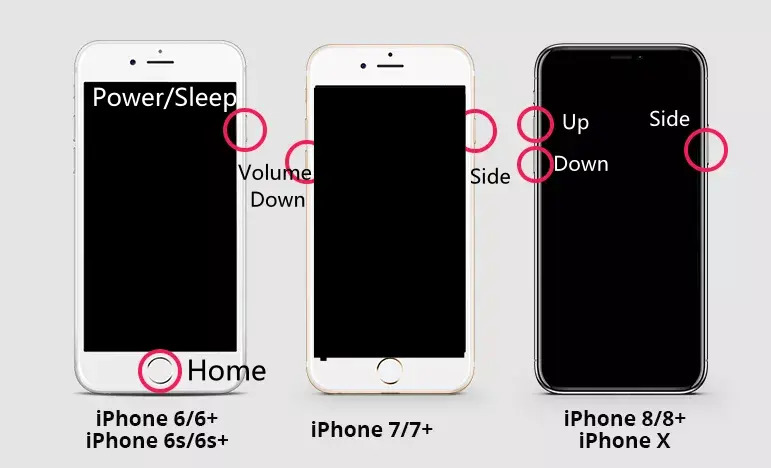
If you're having problems with Guided Access not working in iOS 16, the first thing you should attempt is a simple restart or Force Restart. If a simple restart does not solve the problem, you might try a reboot on your iOS device. Various iPhone models require different processes.
If you're using an iPhone 13/12/11/X/8, follow these steps:
- The Volume Up and Volume Down buttons should be pressed and rapidly released.
- Then keep holding the Side button until you see the Apple logo.
On an iPhone 7 or iPhone 7 Plus, do the following:
- For at least 10 seconds, press and hold the Side and Volume Down buttons until you see the Apple logo.
On an iPhone 6s or earlier:
- Press and hold the Home and Power/Sleep buttons for at least 10 seconds.
Way 2. Delete the Kiosk Policy
Apple has introduced the Kiosk policy, which may manage apps that haven't been installed yet. The iOS device will try to load the software and lock it down as a kiosk when it turns on. If the app is not recognized, the smartphone will be locked down. You must remove the Kiosk policy for this to work, although there are exceptions.
Remember that deleting the Kiosk policy will only work if deployed, the Kiosk software hasn't been installed, or the Guided Access is in supervised mode. You can delete the Kiosk policy from the device by following the steps outlined below:
- 1. To begin, navigate to the "Policies" tab and select the "Kiosk policy".
- 2. Now press the "Manage" button and select "Move to archive".
- 3. After that, choose the archived policy and press the "Manage" button.
- 4. Finally, press the "Delete" button to remove the policy.
Way 3. Set Accessibility
The Guided Access on iPhone not working issues come in some cases owing to a misconfiguration in the accessibility-related settings. The device will not be locked down in a non-responsive state if misconfiguration issues cause the error.
To optimize the accessibility settings, go to Settings, Accessibility, and disable Guided access.
Way 4. Factory Reset your iPhone
Make a backup of your iPhone first to ensure that you can restore your data later. Follow these steps to factory reset your iPhone:
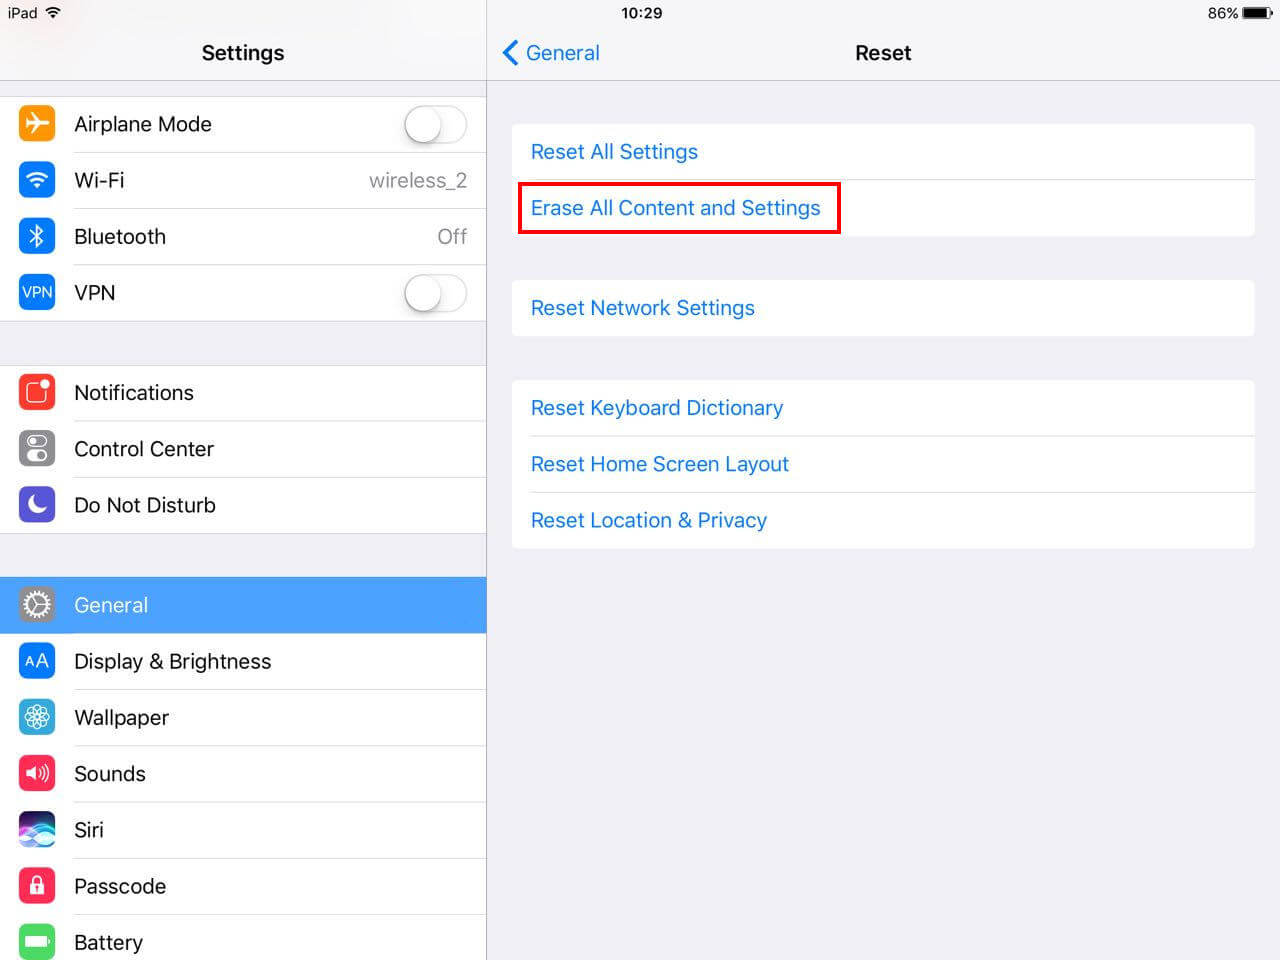
- 1. Scroll down to "General" in "Settings".
- 2. Tap on the "Reset" button present at the bottom of the "General" page.
- 3. To factory reset your iPhone, select "Erase All Content and Settings".
- 4. After entering your passcode, your device will ask you to confirm that you wish to delete everything. To confirm, tap "Erase".
5. Reckoning on how much data you have on your iPhone could take a few minutes, but your device will resume as new after it's done.

Way 5. Restore iPhone via iTunes [Risk of Data Loss]
You can use this strategy to resolve How do I fix Guided Access on my iPhone? Follow the steps below to restore your data using iTunes:
- Step 1: Open iTunes on your computer and plug in your device. iTunes will recognize the device and highlight the device icon.
- Step 2: To generate a backup of your data, go to the "Summary" page and select "Backup Now." Then choose "Restore", which will remove all of your content and settings from the device.
Step 3: After the device has been restored, it will bring you to the setup screen. To restore the backup, navigate to the Apps and Data panel and choose the iTunes backup file.

Way 6. Repair iOS System to Fix Guided Access Not Working [Free of Data Loss]
UltFone iOS System Repair app is the greatest solution you can attempt. Users will be able to cure all types of iOS bugs with this tool without losing any data. As a result, it's worth trying to cure Guided Access issues as well as other iPhone issues such as recovery mode loops, and Apple logo stuck, iPhone won't turn on, and so on.
Features of UltFone iOS System Repair:
- To enter and exit recovery mode on an iPhone, iPad, or iPod, click once.
- Fix 150+ iOS system issues like the Apple logo, reboot loop, and blank screen without losing data.
- Without a password, reset iPhone/iPad/iPod Touch/iTunes/Finder.
- Without iTunes, you can downgrade from iOS 16 to iOS 15.
- All iPhone models and iOS versions are supported, including the iPhone 13 series and iOS 16.
Step by Step Process to Use UltFone iOS System Repair
-
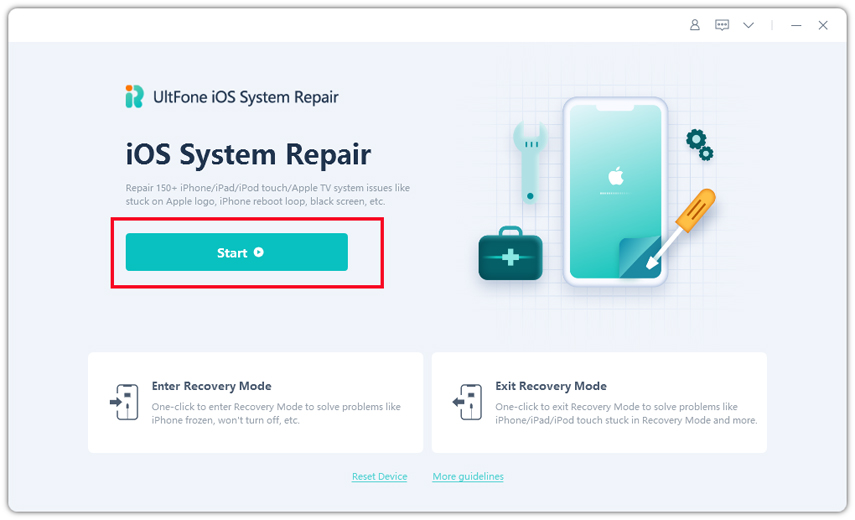
Step 1 Connect your iPhone/iPad/iPod touch to the computer after downloading and running this program on your PC/Mac. To enter the iOS system repair module, click "Start".

-
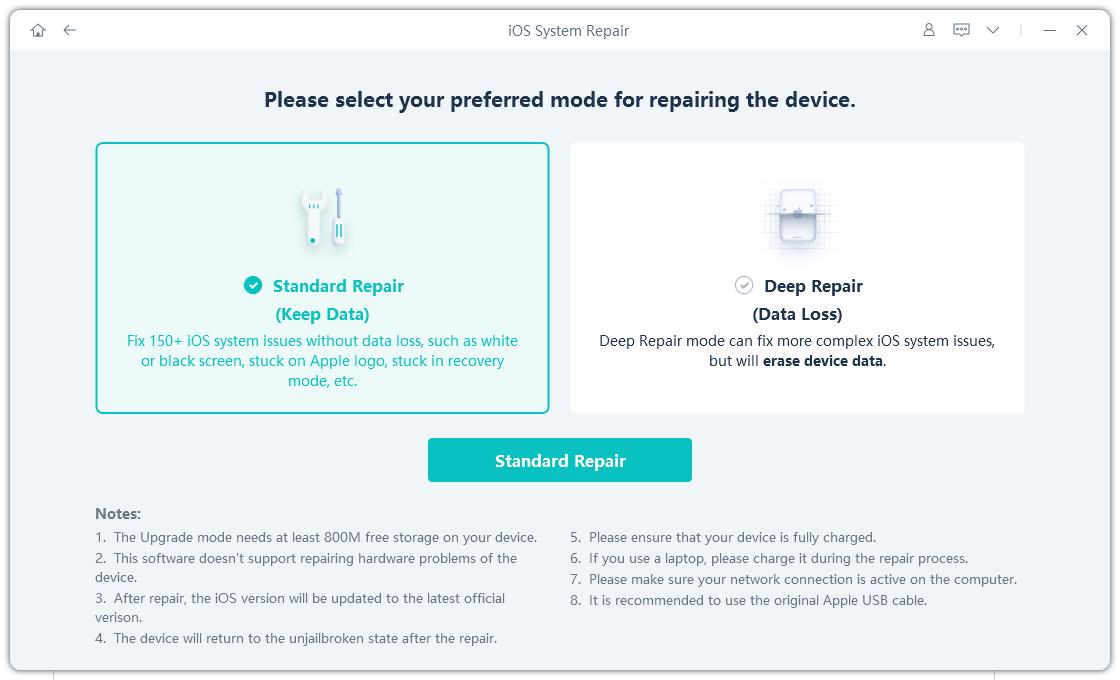
Step 2 To continue, click "Standard Repair" on the next screen. There are two repair modes available, as seen on the interface: Standard Repair and Deep Repair. The only difference is that Standard Repair can address any iOS fault without losing any data.On the other hand, the Deep Repair mode will wipe everything off your device and assist you in resolving more severe iOS issues that the Standard Repair option failed to fix.
 Note: If your iDevice cannot be identified, this program will instruct you to put it in recovery mode or DFU mode manually.
 -
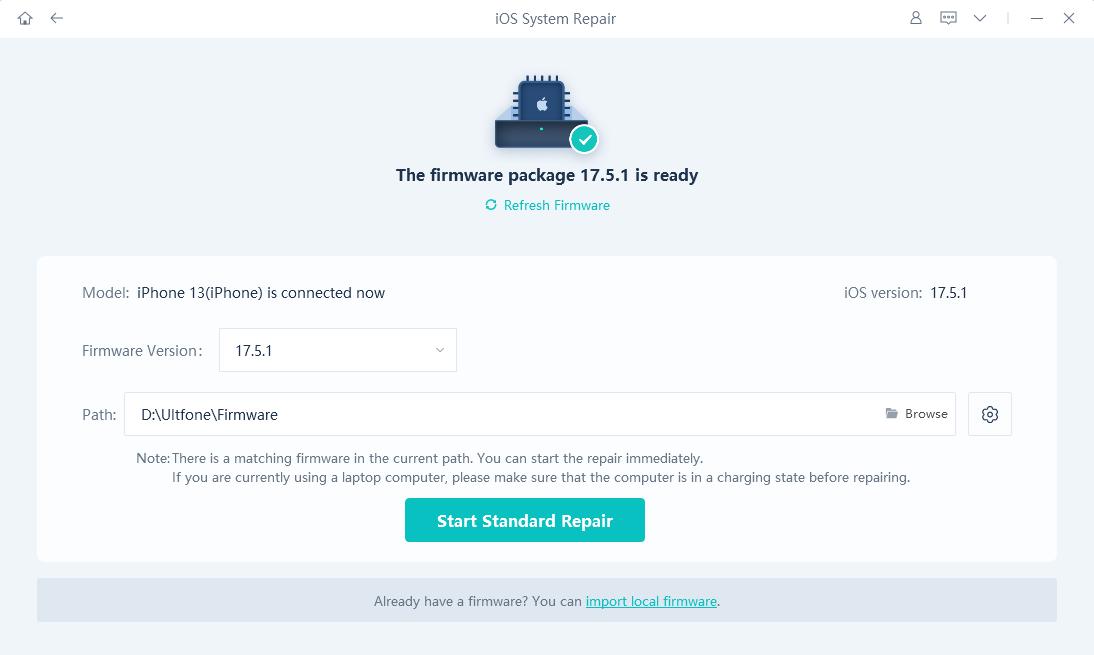
Step 3 You must first click the "Download" button to obtain your device's automatically matched firmware package before proceeding with the system repair. You can change the protected path by clicking "Browse" and selecting a different location to save the firmware package. Please be patient as the firmware package is approximately 2.5 GB in size, and keep the Internet environment around you clean.

-
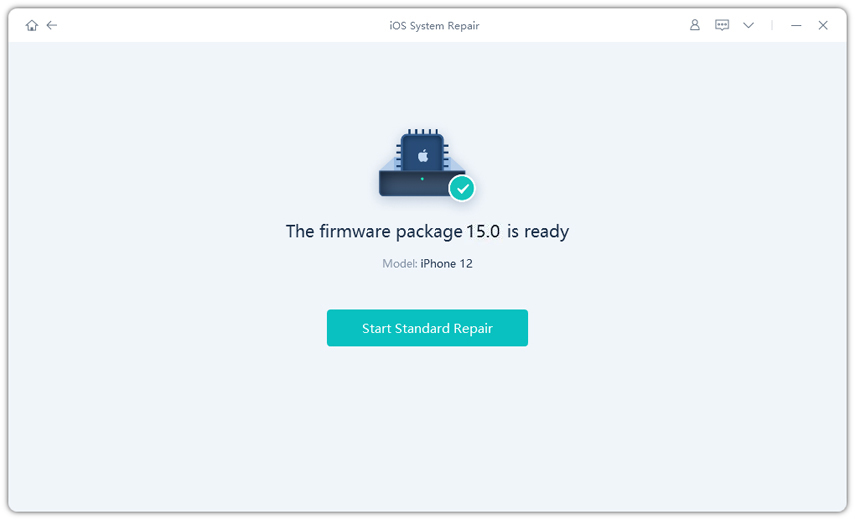
Step 4 Click "Start Standard Repair" when the firmware package has been successfully downloaded to address the iOS issues on your device. Allow a few minutes for the iOS system to be repaired.

-
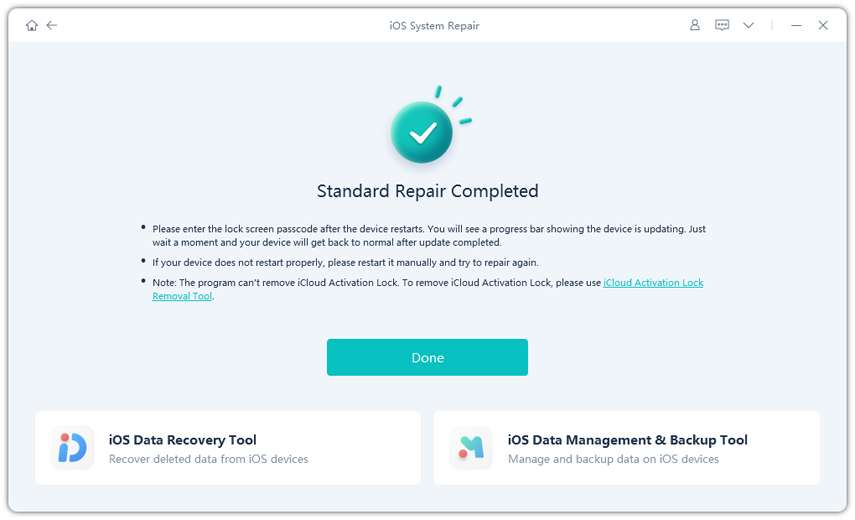
Step 5 Your iOS device will immediately reboot after the iOS system recovery is completed, and everything will return to normal.

Conclusion
Now we all know how to fix Guided Access not working in iOS 16 for iPhone/iPad . Any of the solutions given above will resolve the problem. UltFone iOS System Repair is the preferred method for resolving iOS issues since it has a high success rate and no data loss.


