As a professional Android lock screen removal tool, UltFone Android Unlock can quickly remove all types of Android lock screens, including screen pin, pattern, passcode, and fingerprint. And it can also help you remove Google lock (FRP) for Samsung, Xiaomi, Redmi, Vivo, Huawei, OPPO, Realme, Oneplus, and more.
- Part 1. Remove Android Lock Screen without Password
- Part 2. Remove Google Lock (FRP) from Samsung Devices
- Part 3. Remove Google Lock (FRP) from Xiaomi/Redmi Devices
- Part 4. Remove Google Lock (FRP) from OPPO/Realme Devices
- Part 5. Remove Google Lock (FRP) from Vivo Devices
- Part 6. Remove Google Lock (FRP) from OnePlus Devices
Part 1.Remove Android Lock Screen without Password
UltFone Android Unlock enables you to access your Android device again without any passcode. To get started, please download and install UltFone Android Unlocker on your computer first.
Step 1: Launch UltFone Android Unlock
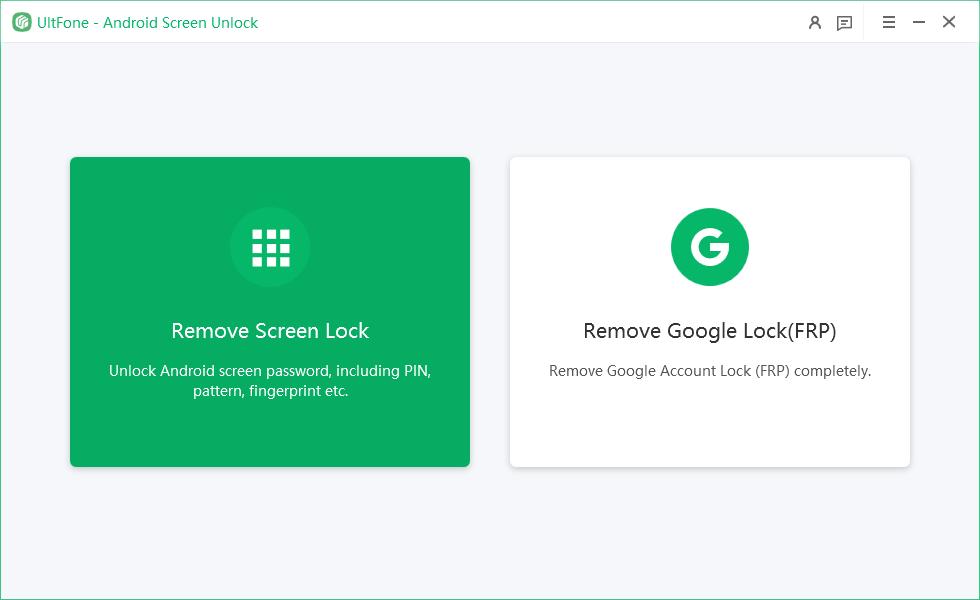
Launch the program, choose feature "Remove Screen Lock" and connect your device to the computer with a USB cable. The program will install the driver for your device when you run it.
Step 2: Remove the Screen Lock
- Scenario 1: Unlock Early Samsung Devices Without Data Loss
- Scenario 2: Unlock Most Android Devices With Data Loss
Scenario 1: Unlock Early Samsung Devices Without Data Loss
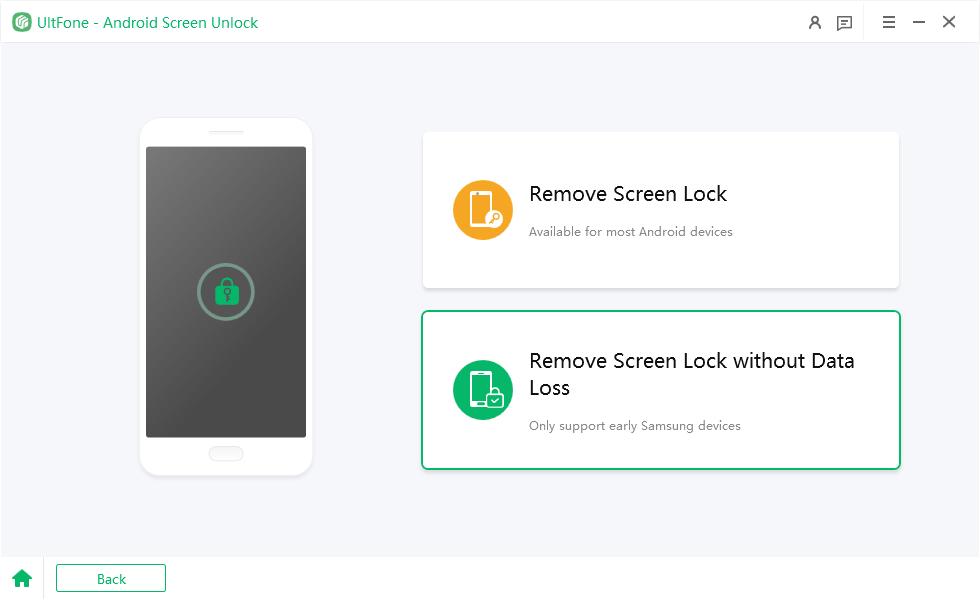
1. For some earlier Samsung devices, UltFone Android Unlock supports removing their screen lock without losing data on Windows. Choose Remove Screen Lock without Data Loss option, and then click Start to begin.
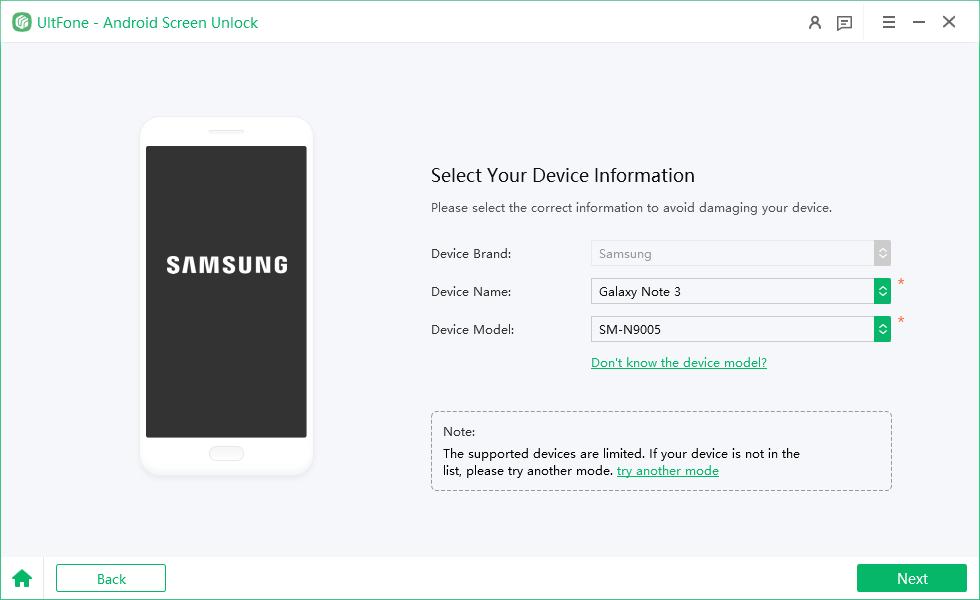
2. Next, select the correct device name and model according to your phone. If you do not know the information, click on “Don’t know the device model?” below to check how to get. And if your Samsung device is not in the list, then you have to try another mode to unlock it.

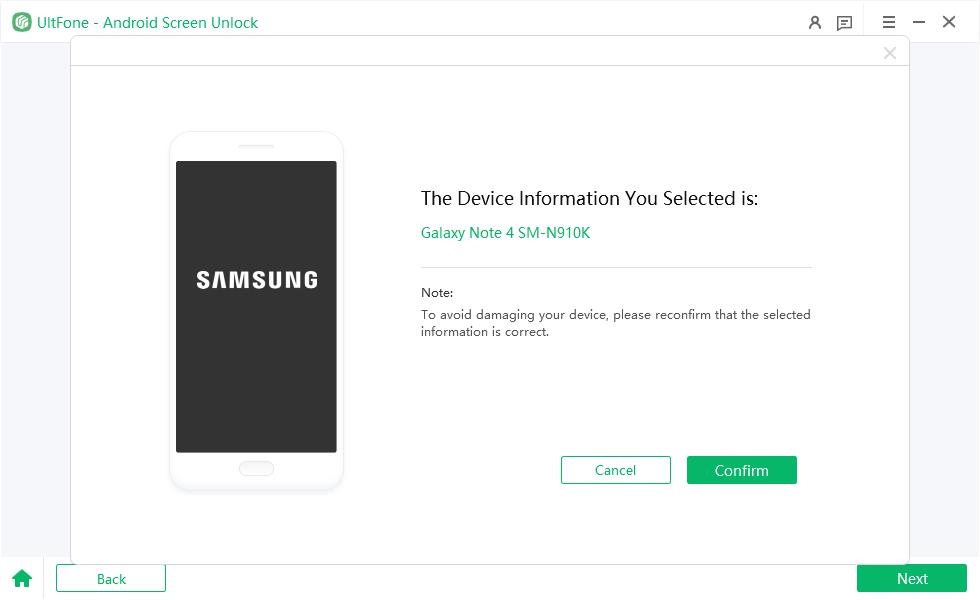
3. Please confirm the device information you select is correct.
4. Then it will automatically download the data package. After it finishes, click Next to continue.
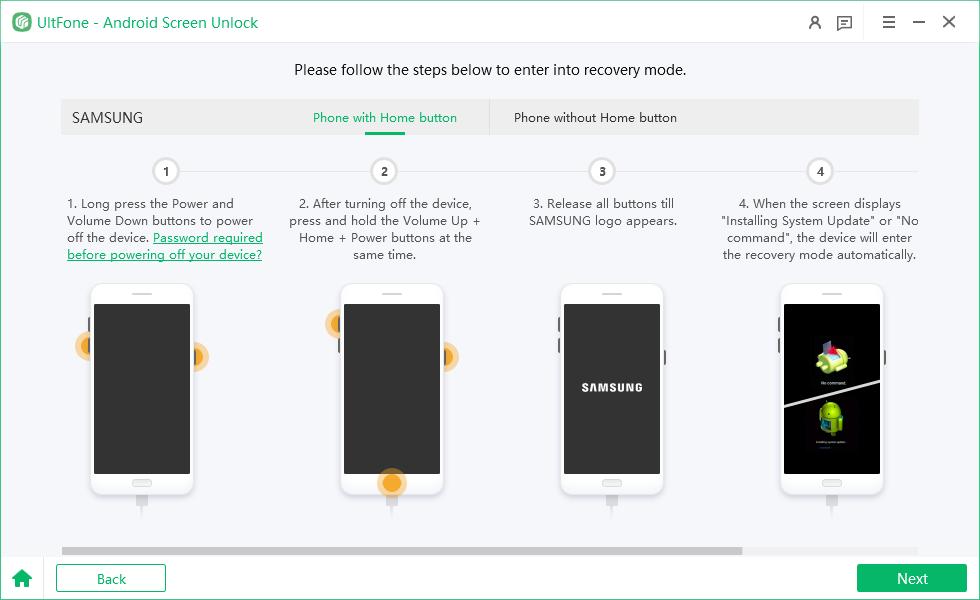
5. You should then put your Samsung phone into download mode by following the on-screen steps. Click on Start when it successfully gets into download mode.
6. The program will start to remove the screen lock. Wait a few minutes for it to finish. Then you can unlock your phone without password successfully.
Scenario 2: Unlock Most Android Devices With Data Loss
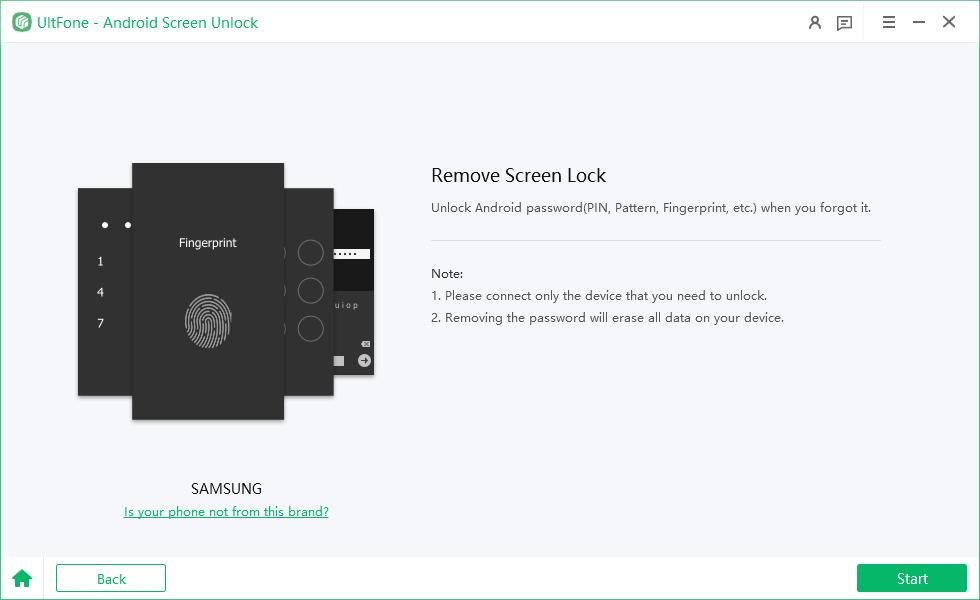
1. For other Samsung and Android devices, choose Remove Screen Lock option. The software will automatically identify the brand of your device. If it shows incorrect device brand, click “Is your phone not from this brand?” to select the device brand that needs to remove the Screen Lock and then click Start to begin.
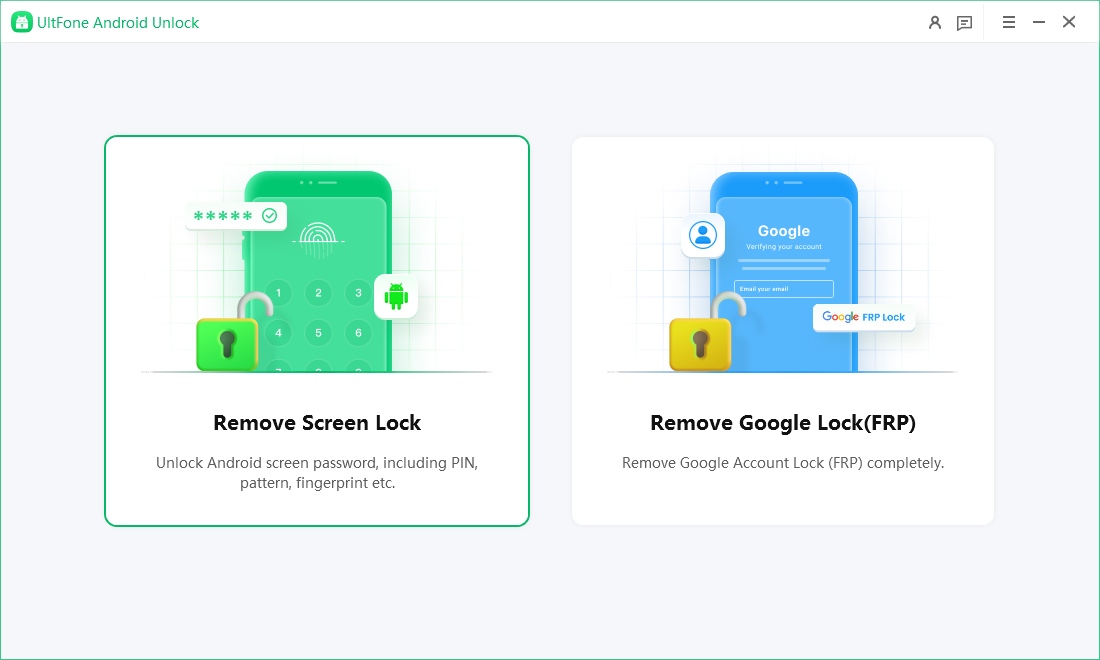
2. Then you must confirm that "Removing the lock screen password will erase all data on the device". If you are sure, just click button "Yes", then UltFone Android Unlock will start to remove lock screen automatically.
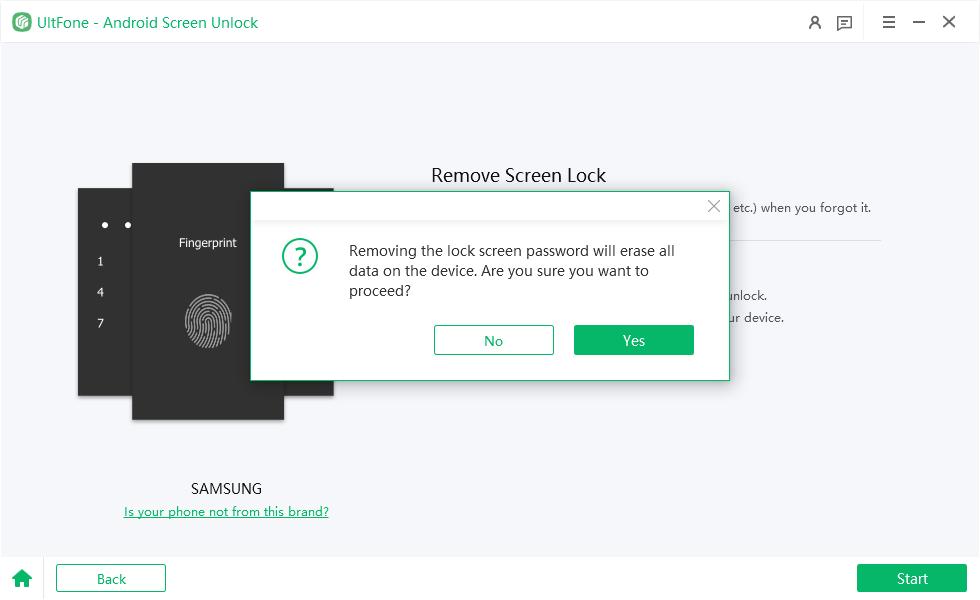
- Note: If you are using a Samusung device, the removing process will be completed successfully here, you don't need to follow the instructions below.
3. Once the removing process is done, you will be asked to enter recovery mode and perform a factory reset on the Android phone.

4. At last, UltFone Android Unlock will automatically remove the lock screen. A few minutes later, you will see the whole process completely.

Part 2.Remove Google Lock (FRP) from Samsung Devices
If you purchase a locked used Samsung device and don't have the password or if you just lost your Google password. Whatever the reason, UltFone Android Unlock can assist you in 5 minutes in removing Samsung FRP on both Windows and Mac. Support Android 6/7/8/9/10/11/12/13 on Samsung.
Step 1: Connect Samsung Device
After installing UltFone Android Unlock on your computer, connect your locked Samsung device, then choose the feature "Remove Google Lock(FRP)".
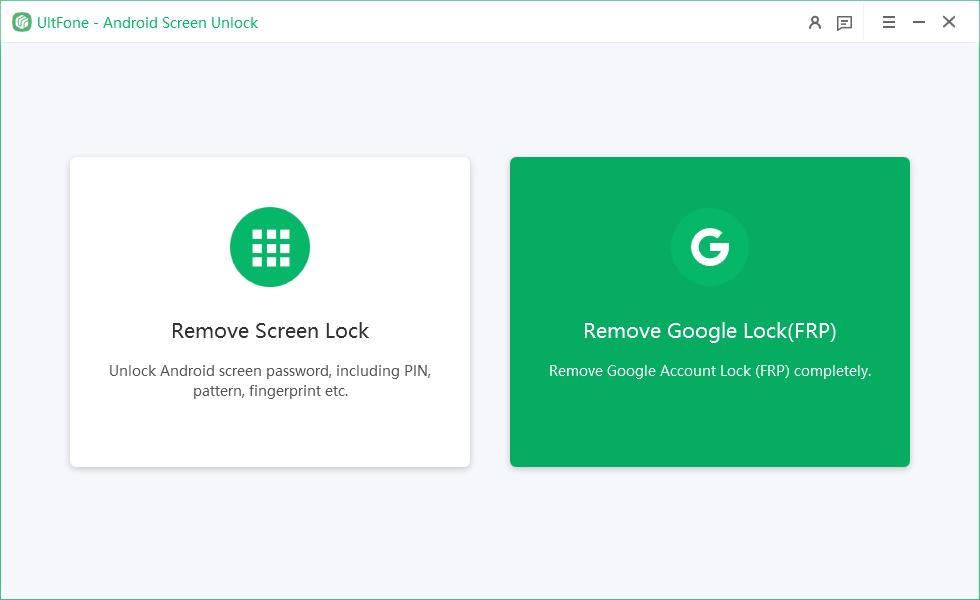
Step 2: Select Device OS Version
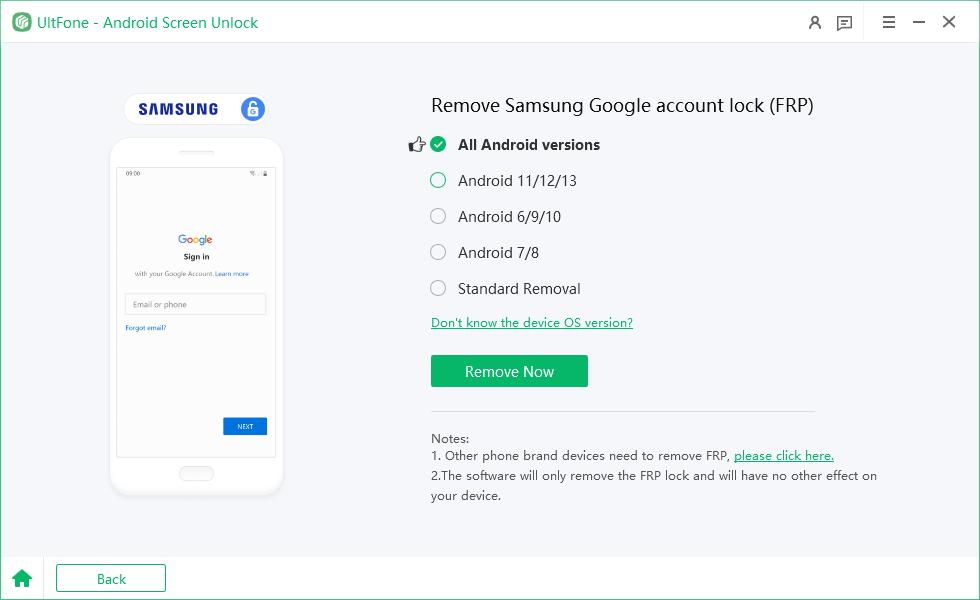
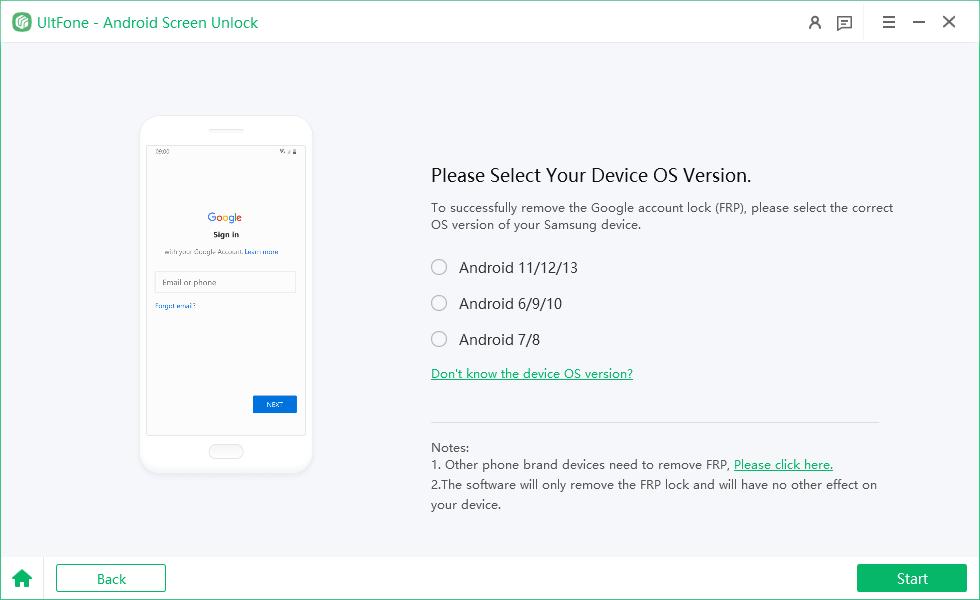
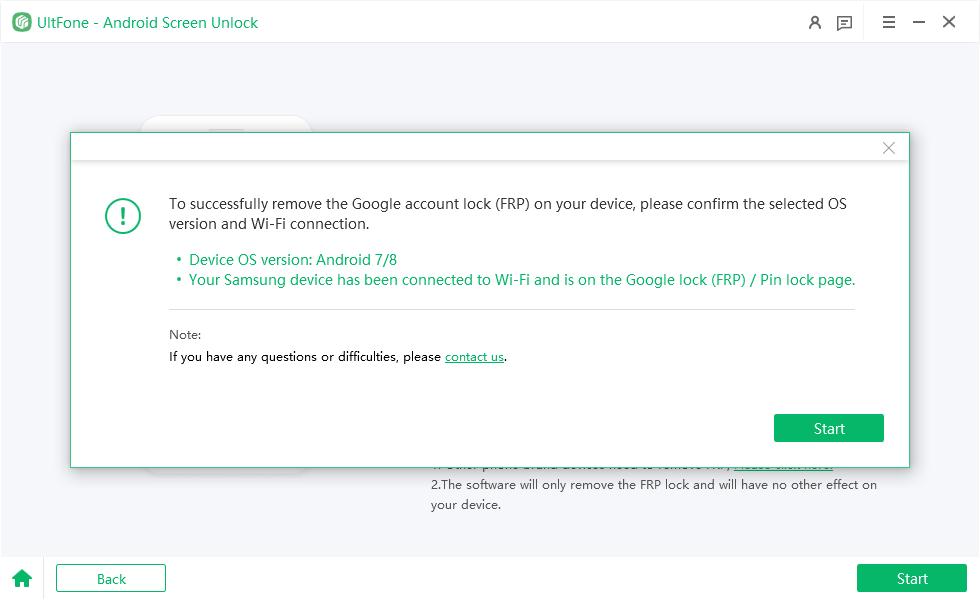
Now, you will jump to a new screen. Please select the OS version of your Samsung device and click "Start". If you don't know, click on the "Don't know the device OS version?" option to check.
Step 3: Remove Samsung FRP Lock
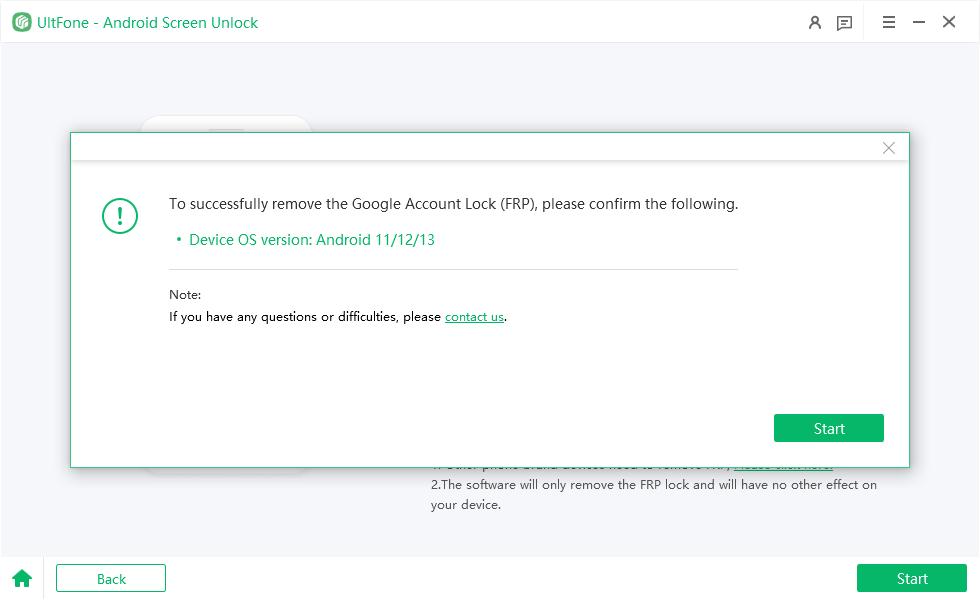
To continue, you need to check the on-screen notes and confirm. Then click on "Start". As there is a little difference in the next steps according to the device OS version you selected, so just choose your Samsung version and go on.
- 1. All Android Versions
- 2. For Android 11/12/13
- 3. For Android 6/9/10
- 4. For Android 7/8
- 5. Standard Removal
1. All Android Versions
Choose “All Android Versions” and click “Remove Now” to begin FRP removal.

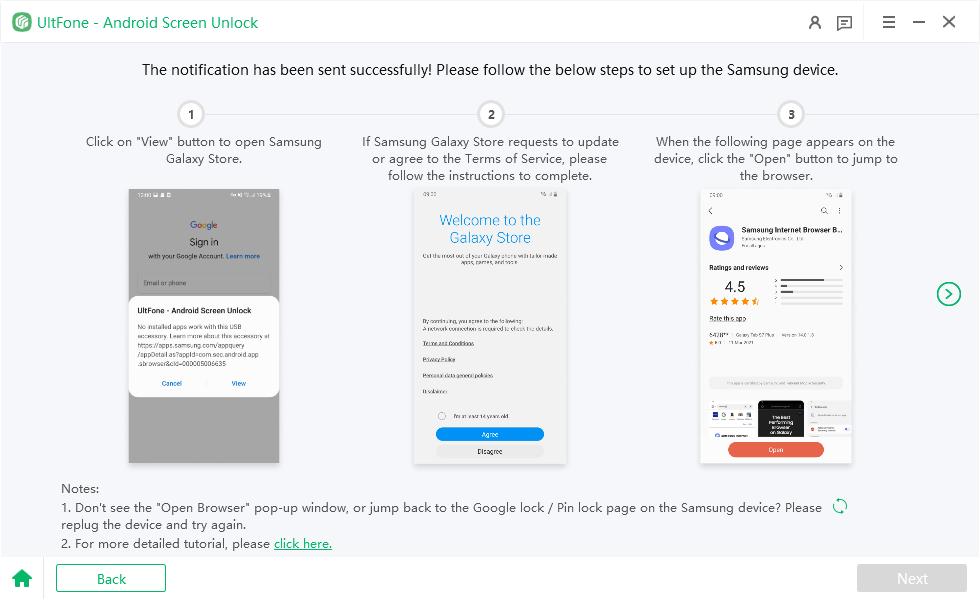
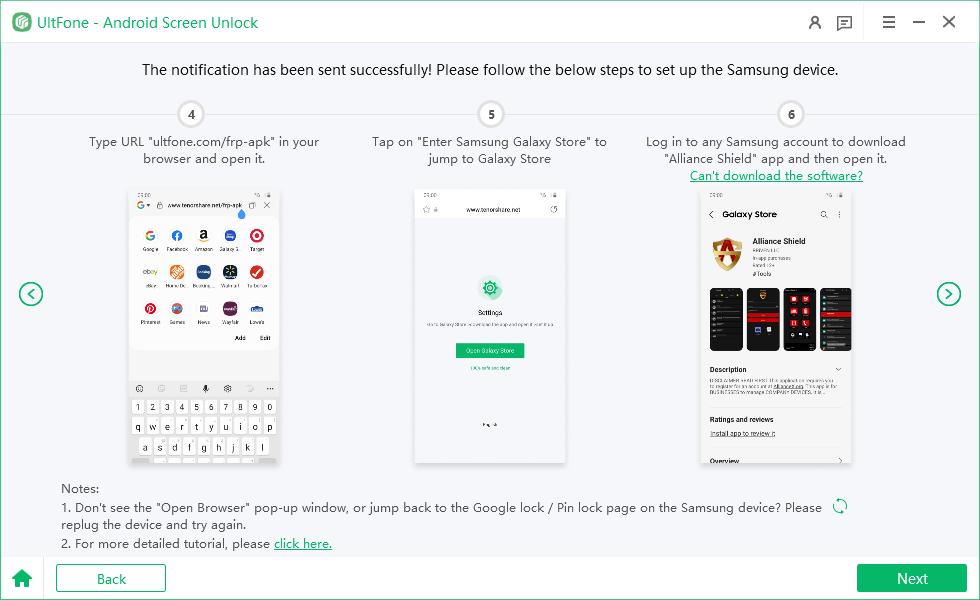
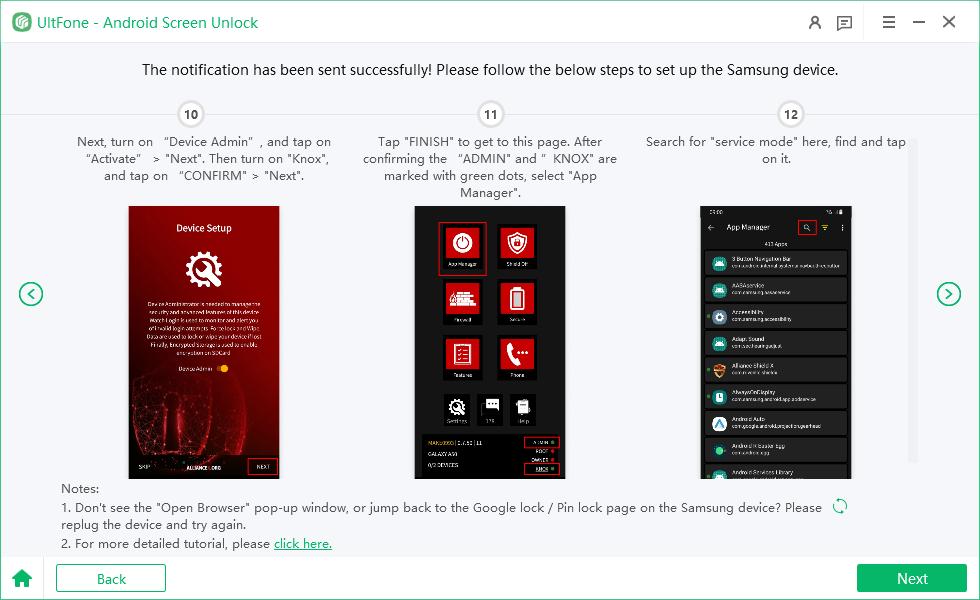
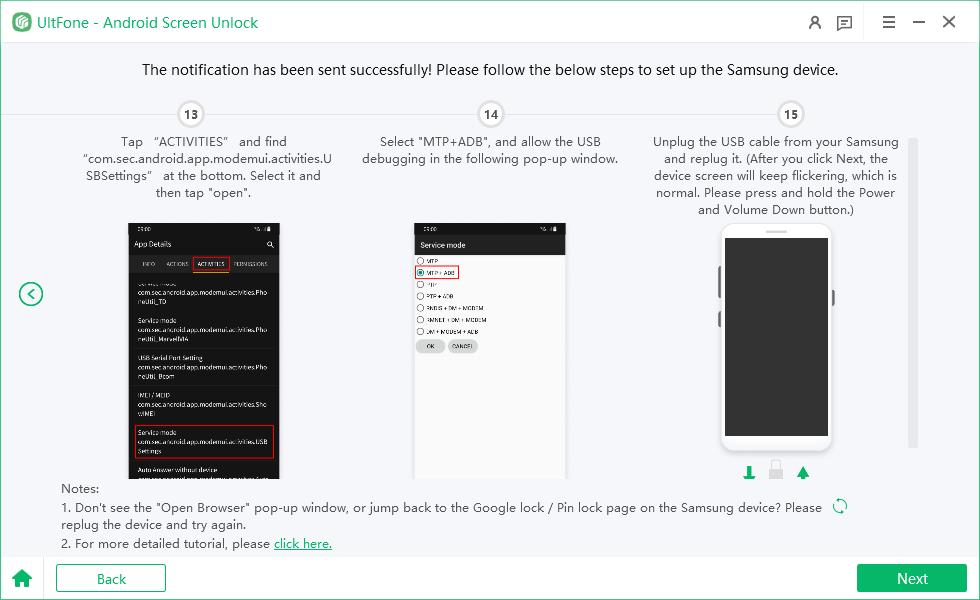
Then follow the on-screen instructions on your device to set up your Samsung device.
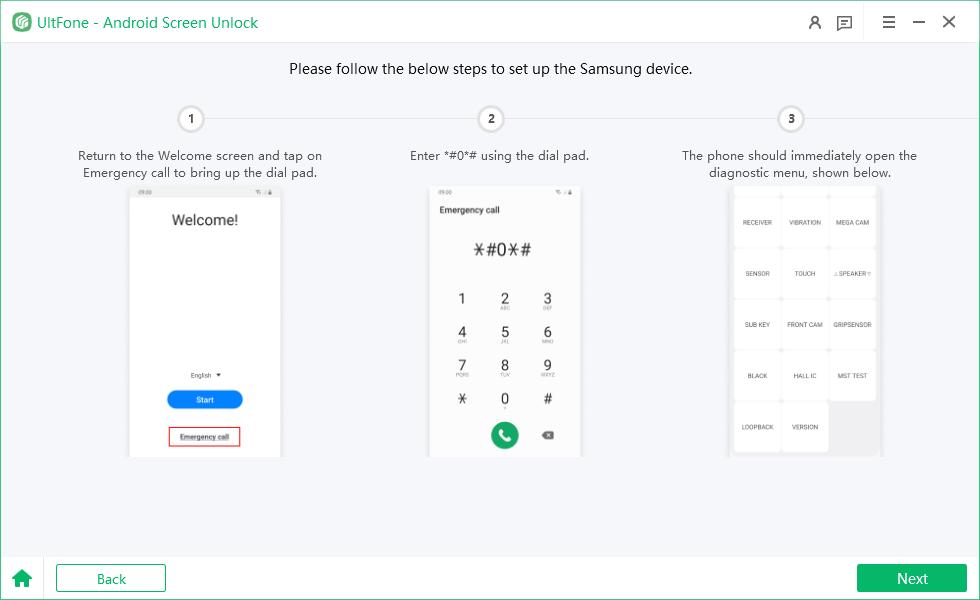
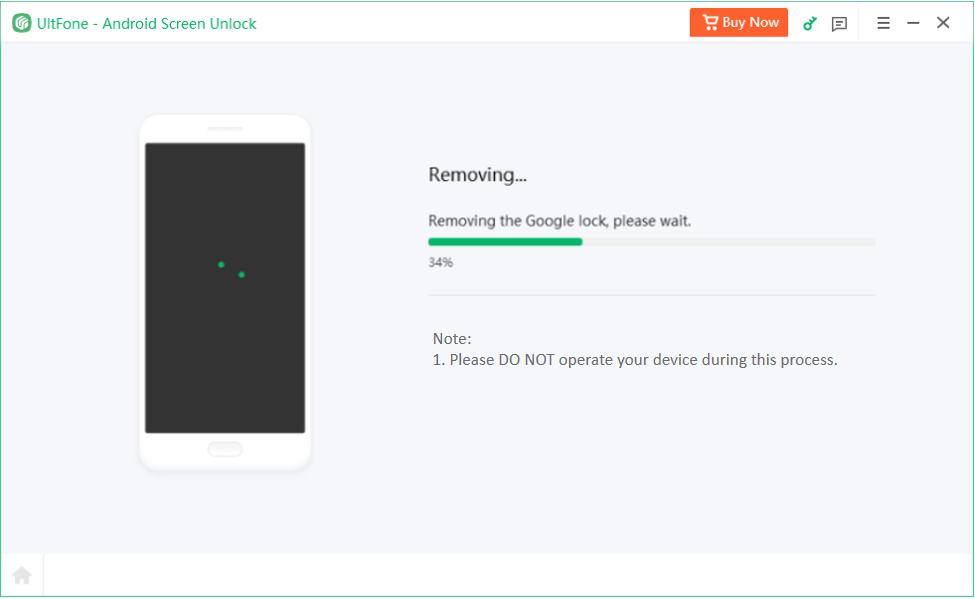
Once the process is completed successfully, the Google lock will be removed automatically. Please wait a few minutes and avoid operating the device during this process.
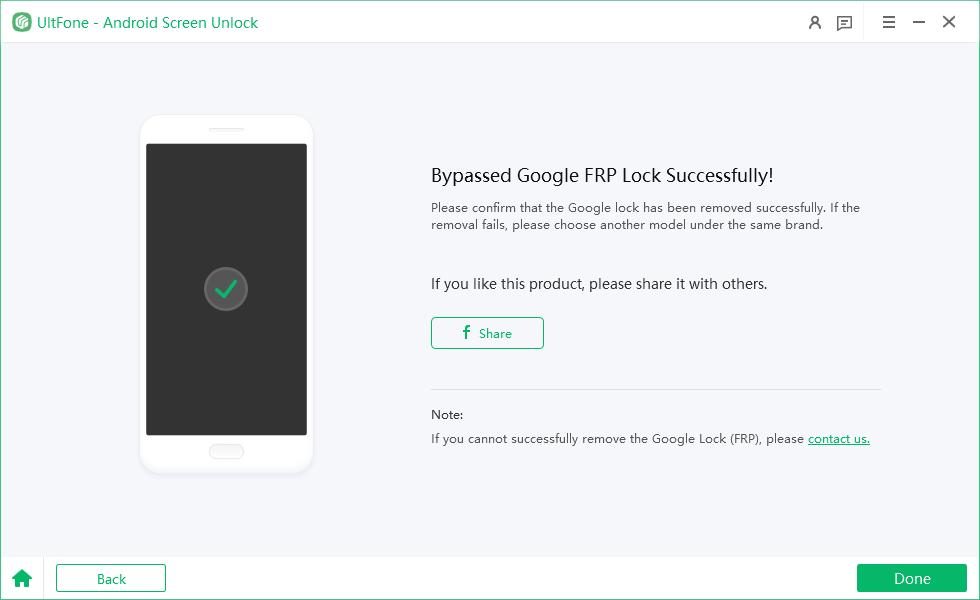
After the bypass is successful, you will enter a page prompting you that Google FRP lock has been removed successfully.
2. For Android 11/12/13
1. Click the "Start" button when a confirmation popup appears.
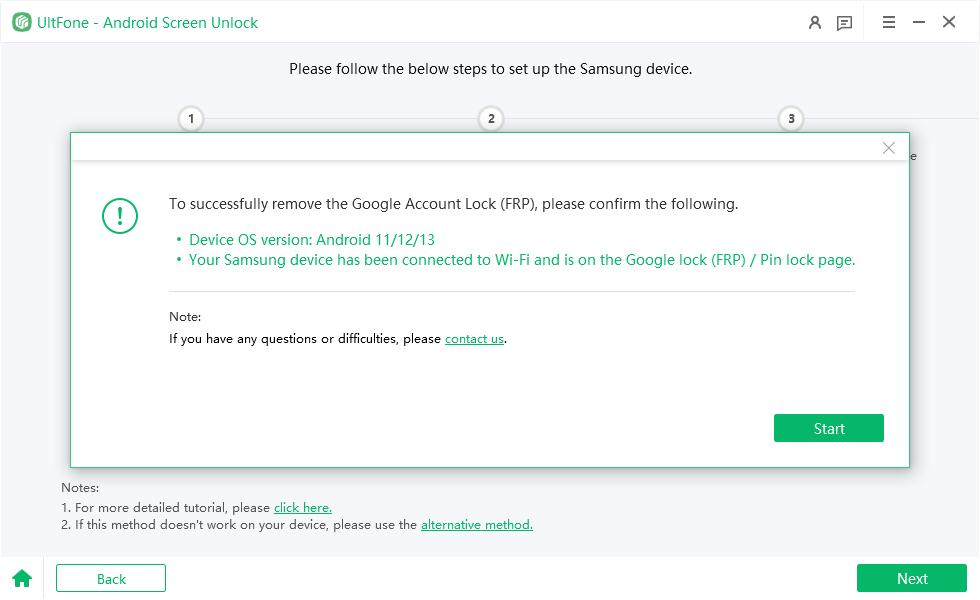
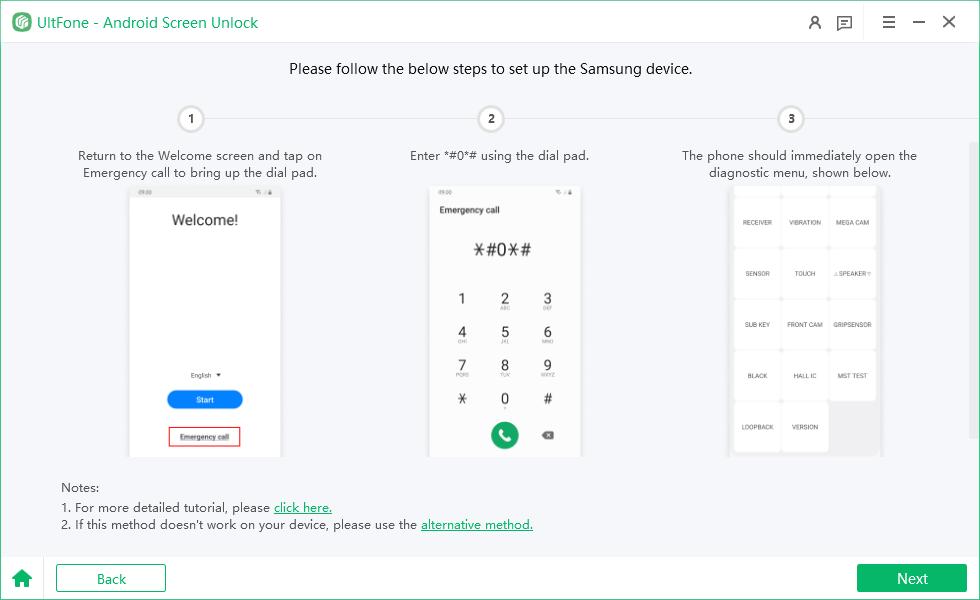
2. On your Samsung device, go back to the very first Welcome Screen. Tap "Emergency call" to bring up a dial pad from where you need to enter #0#. Then your device will immediately enter its hidden diagnostic mode.
3. Now, click the "Next" button on the bottom right corner of the program window. UltFone Android Screen Unlock for Android will start removing the FRP lock from your device.
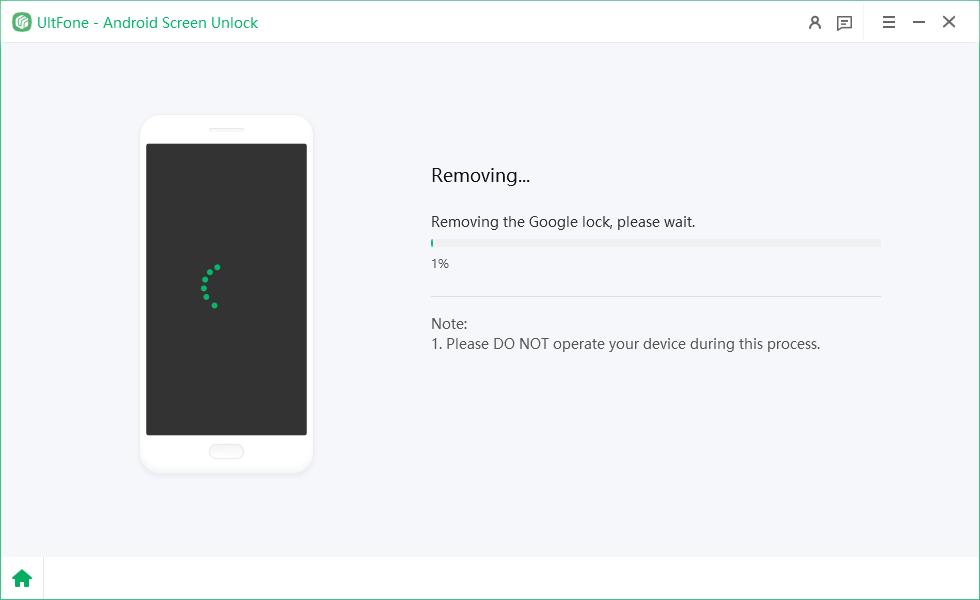
4. It may take a few minutes for the Samsung FRP bypass process to complete. When the Google FRP lock is successfully removed, a success message will be shown on the screen and your Samsung device will reboot immediately.

5. Once your phone restarts, you won't be asked to verify your Google account and you can just follow the onscreen instructions to set up your phone as new.
Alternative Method:
In case the above method doesn't work on your device for some reasons or there isn't a dial pad on your Samsung tablet, we suggest trying the alternative method.
- 1. Go back to the OS version selection page, choose "Android 11/12/13" and click "Start" to proceed.
- 2. Now, click "Alternative method" directly from the Notes.
- 3. On the pop-up window, click "Start" when you confirm that your device has been connected to a Wi-Fi network and it is now on the Google account verification page.
- 4. UltFone Android Unlock will send a notification to the locked Samsung phone that has been connected to the PC.
- 5. Tap the "View" button on your Samsung device to open Samsung Galaxy Store.
- 6. Follow the on-screen instructions to go to Galaxy Store and download the "Alliance Shield" app.
- Note: For the application you downloaded, the usage is in line with their terms, and if there is a violation of your rights, please contact us.
- 7. Open Alliance Shield and go to the login page. You need to register a new account for this app. After sign in, enter the device model and tap on Next.
- 8. Follow the steps to turn on "Device admin" and "Knox". Then go to App Manager and search for "service mode".
- 9. Turn on Service mode and check "MTP+ADB". It is important to check this option and allow USB debugging on your phone. Then unplug and replug the USB cable to your Samsung device.
- 10. Next, UltFone Android Unlock will start removing the Google lock, please wait for it to finish.
- 11. The last step: after the program removes the lock, you can enter the home screen on Samsung. Go to Settings > General management > Reset, and factory reset your device to completely bypass the FRP.
- Note: If your Samsung device is not secured by Knox, the alternative method may not work for you. Please click to check the list of Samsung devices which support Knox.



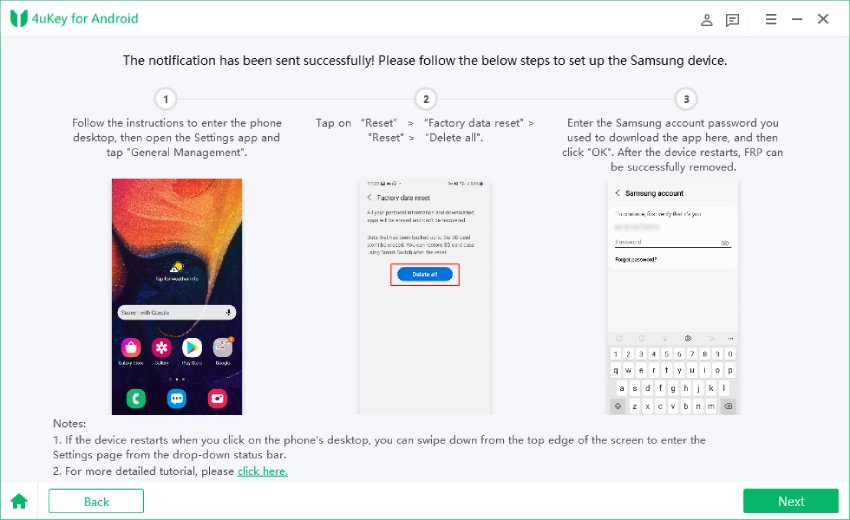
2.For Android 6/9/10
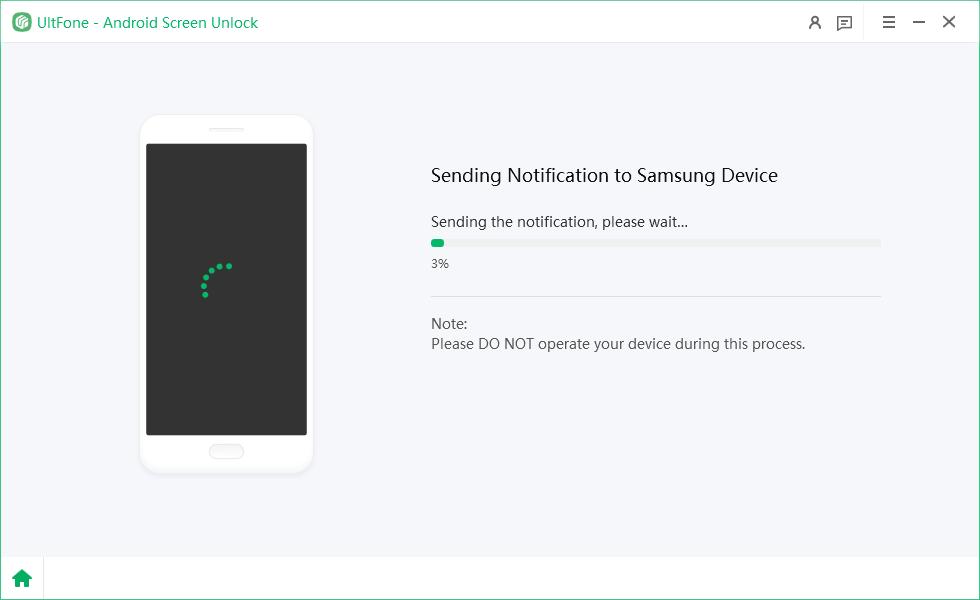
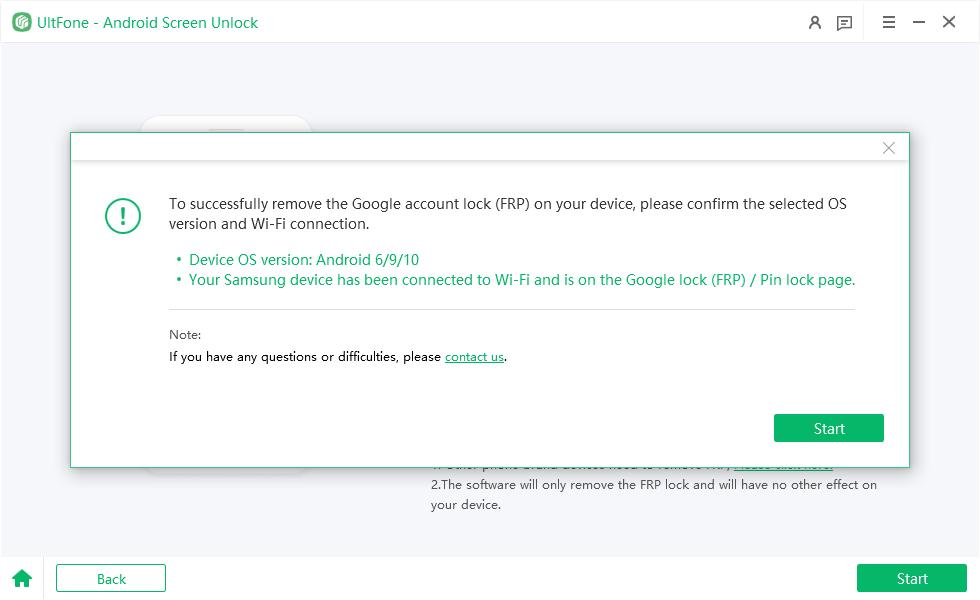
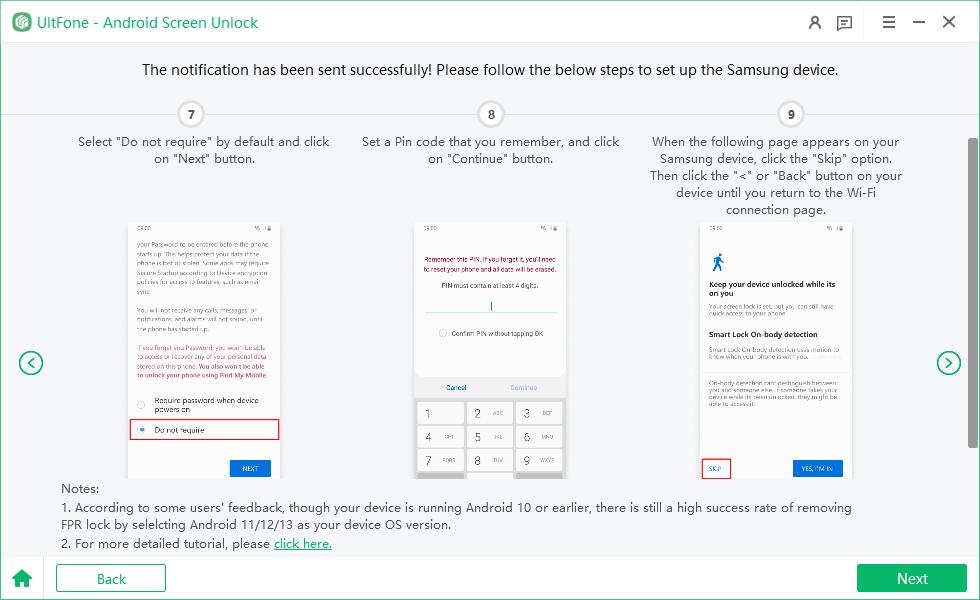
- 1. After you confirm the information and click on Start, Ultfone Android Unlock will send a notification to your Samsung phone.
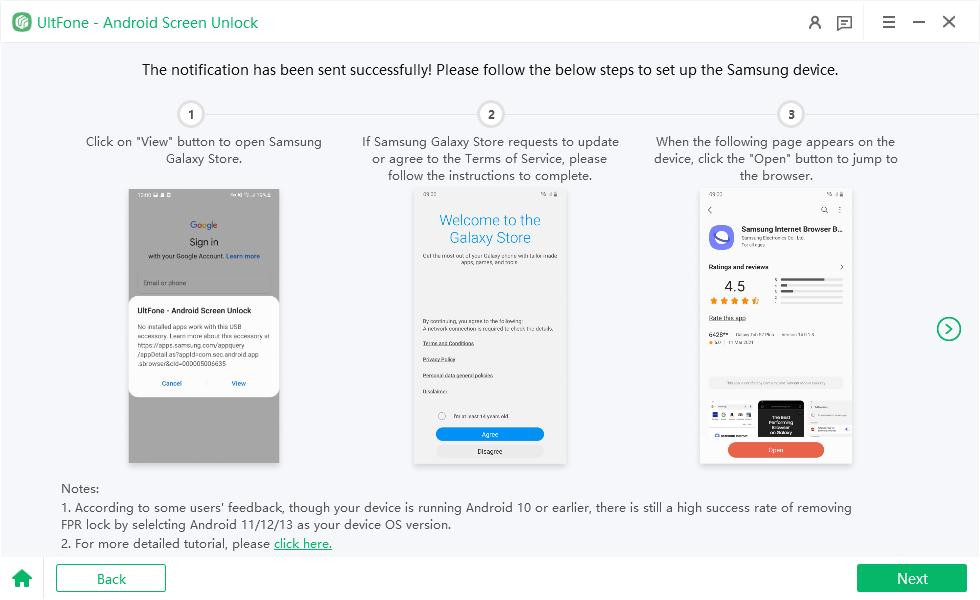
- 2. Click "View" option on your Samsung device, and your phone will go to Galaxy Store. Open Samsung Browser here. If your Samsung Browser app needs updating, update first.
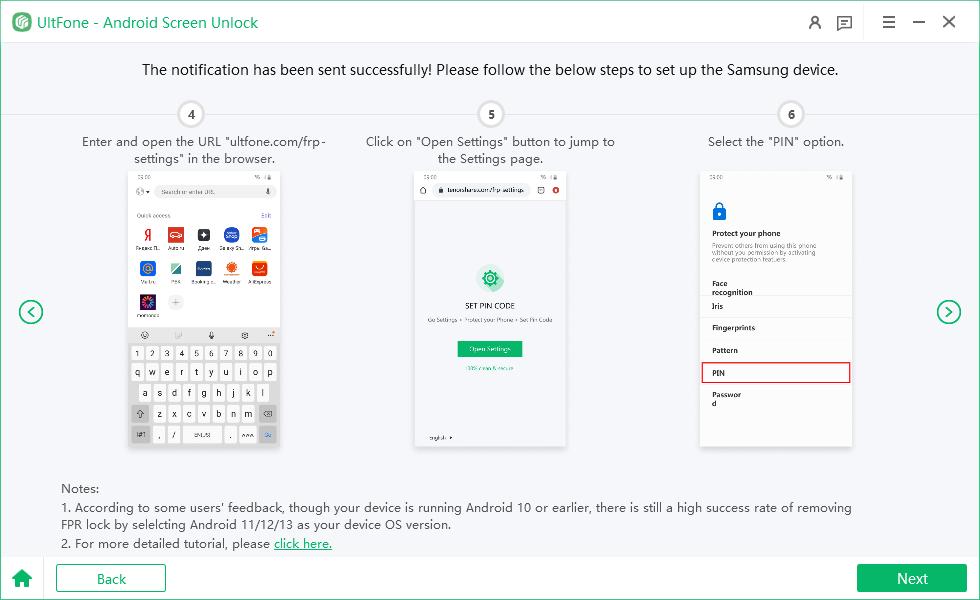
- 3. Click ">" icon to continue. Then, tap on "Open Settings" and you will jump to the Settings page. Choose "Pin" option on your phone.
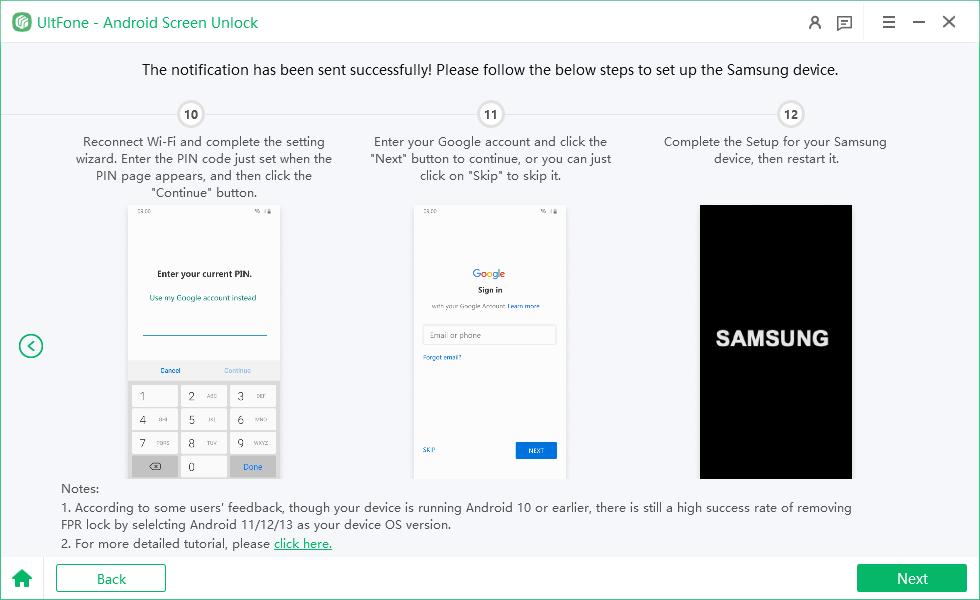
- 4. Then select Do not require and set a pin code in the next page. When the page in step 9 shows, skip it and tap on "Back" button to go back to the Wifi page.
- 5. Go on the final 3 steps. Reconnect Wifi and continue the settings. In the Pin page, enter the pin code just set. Then you can skip or sign in Google account and finish settings. After these, click "Next".

3. For Android 7/8
- 1. Ultfone Android Unlock will send a notification to your Samsung device. Please don't disconnect your phone during the process.
- 2. Click on "View" on your Samsung phone. Without go to Samsung Galaxy Store, your phone will directly jump to Browser and the next steps are the same. Then, tap on "Open Settings".
- 3. Select "Pin" option on the "Protect your phone" page. Set up a pin code you remember.
- 4.In the page of step 7, choose Skip and tap on "Back" or "<" to return to Wifi connection page. Reconnect the Wifi and enter Pin code next. Similarily, skip or log into your Google account.


Step 4: Restart Samsung Device
Last, your device will restart. If it needs a Pin code, use the pin code you just set to access your Samsung device.

5. Standard Removal
Choose “Standard Removal” and click “Remove Now” to begin FRP removal.
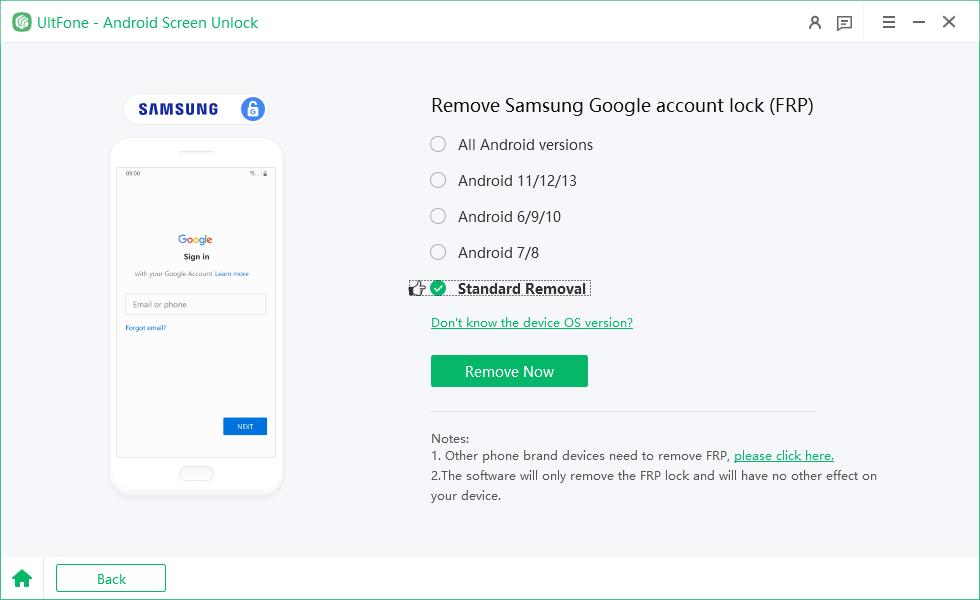
Then the Google account lock will be removed automatically. Please wait a few minutes and avoid operating the device during this process.

Then follow the on-screen instructions on your device to set up your Samsung device.
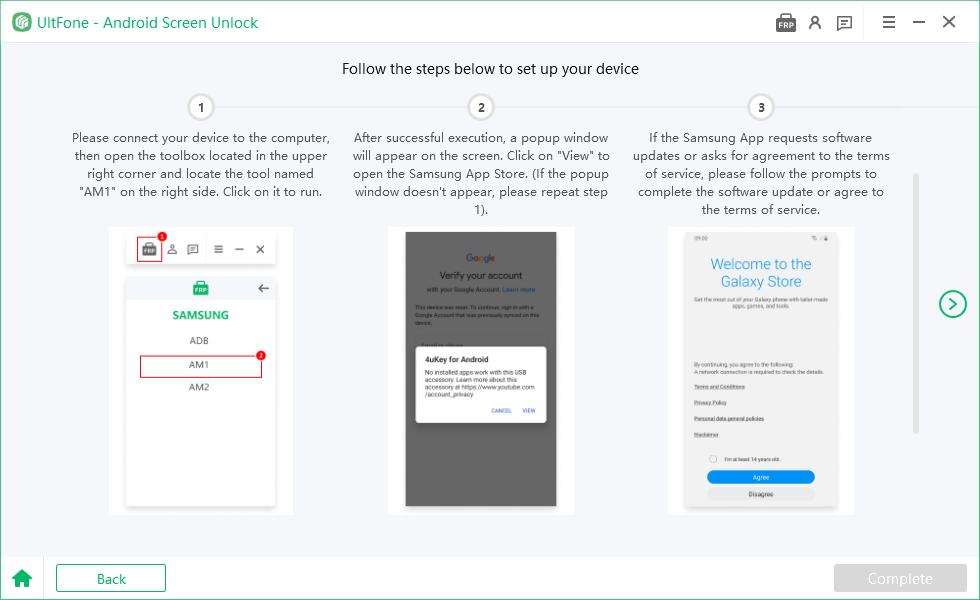
Finally, you will find the Google FRP lock has been removed successfully.

Part 3. Remove Google Lock (FRP) from Xiaomi/Redmi Devices
Step 1: Connect Xiaomi/Redmi Device
After the installation is complete, connect your locked Xiaomi/Redmi device to the computer, then choose the feature "Remove Google Lock(FRP)".

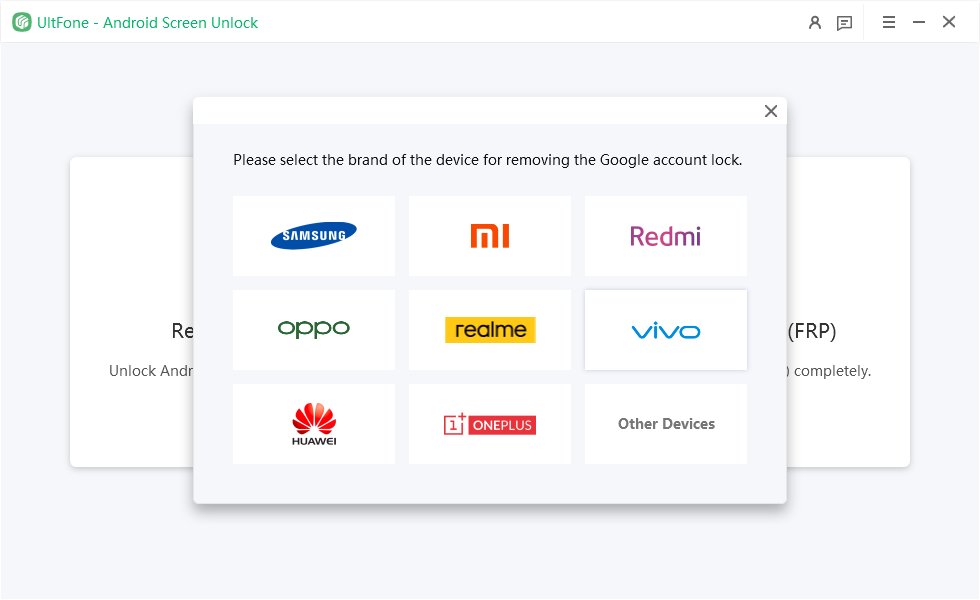
The program will automatically detect the brand of your device. Alternatively, you can also manually select the brand from the pop-up window.

Step 2: Remove Xiaomi/Redmi FRP Lock
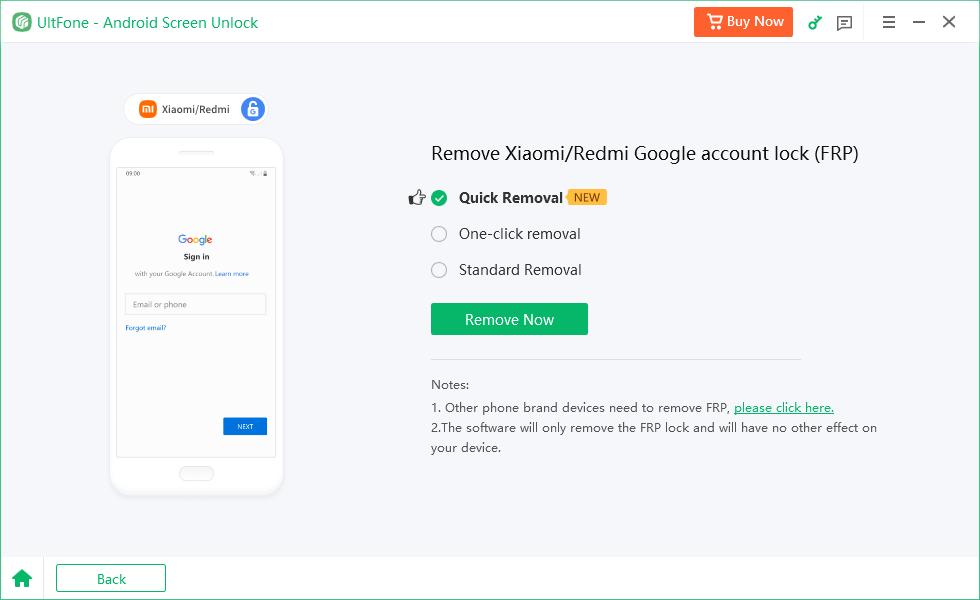
Method 1: Quick Removal
Select the "Quick Removal" option and click “Remove Now”. The program will continue installing the driver.
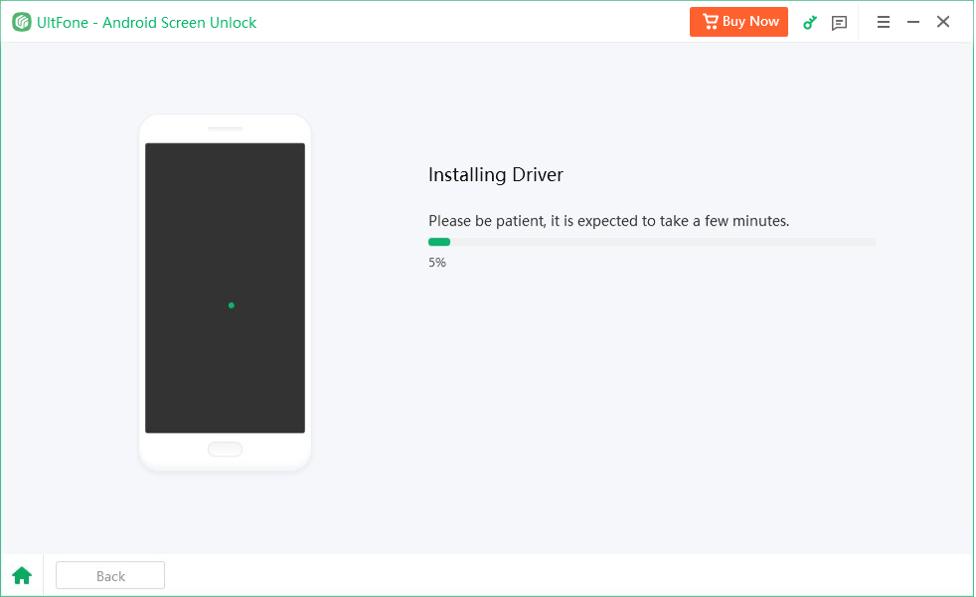
After installing the driver, follow the on-screen instructions on your device.
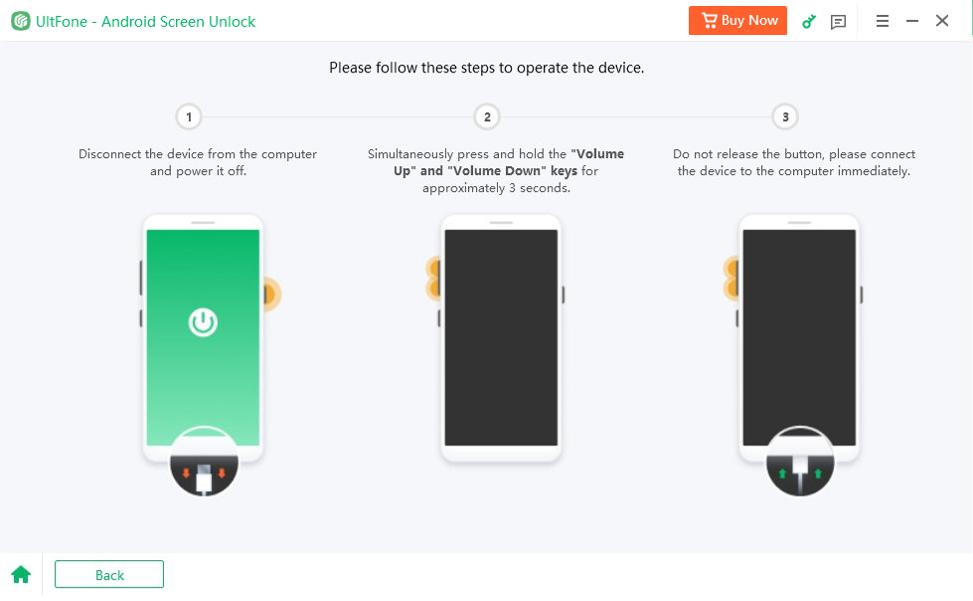
Once the process is completed successfully, the Google lock will be removed automatically. Please wait a few minutes and avoid operating the device during this process.

After the bypass is successful, you will enter a page prompting you that Google FRP lock has been removed successfully.

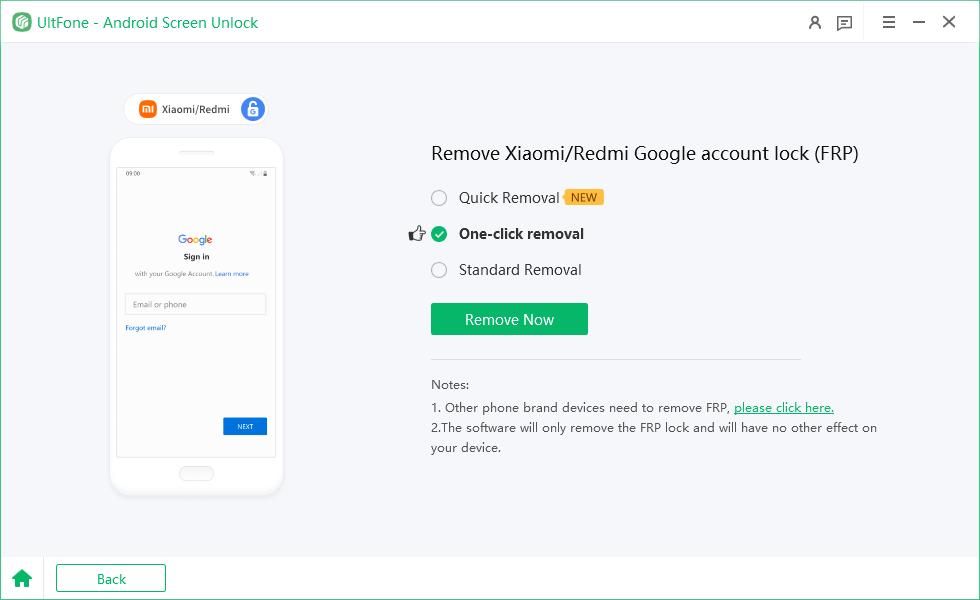
Method 2: One-click removal
Select the "One-click Removal" option and click “Remove Now”.
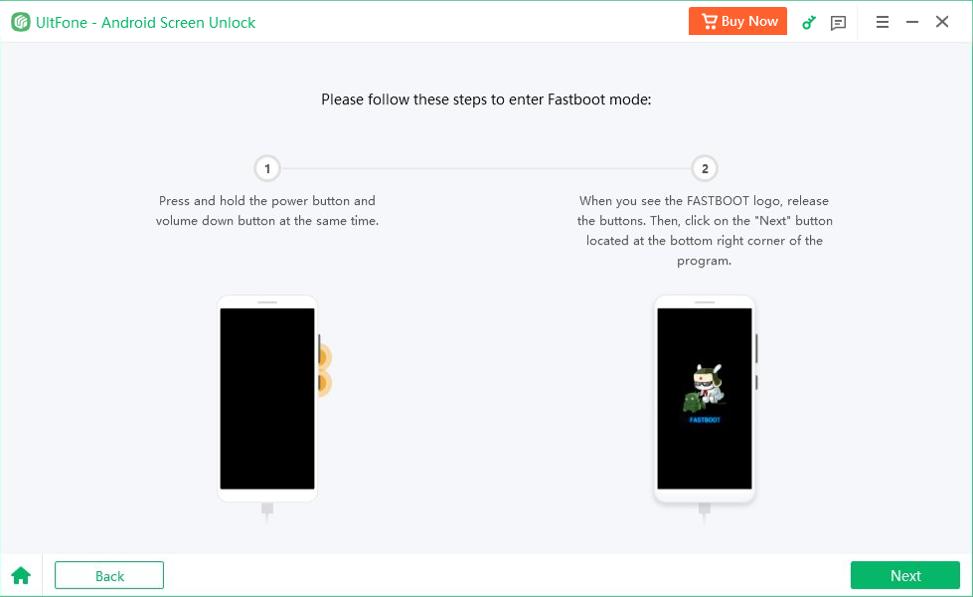
Then follow the on-screen instructions on your device to enter Fastboot mode.
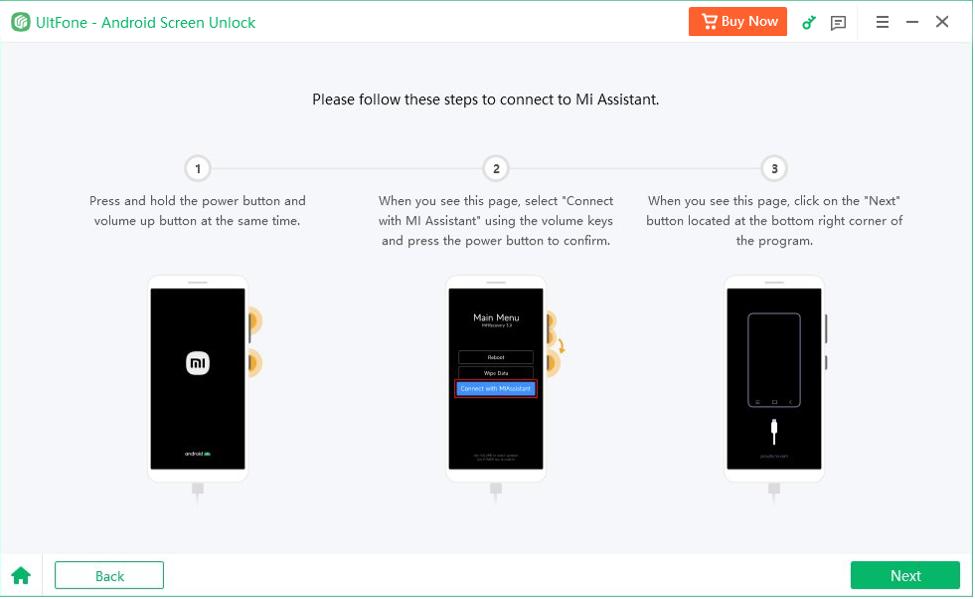
Then use the volume keys to select "Connect with MI Assistant". Press the power key to confirm your selection. Then, click on the "Next" button to continue the process.

NOTE: If your phone has not yet reached the main menu page, click the "Haven't reached this page yet?" link and follow the instructions below to connect to MI Assistant.
Then you will find the FRP lock on your device has been bypassed successfully. Your Xiaomi/Redmi device should restart within a few seconds without Google FRP lock.

Method 3: Standard Removal
Select the "Standard Removal" option to remove Google account lock.
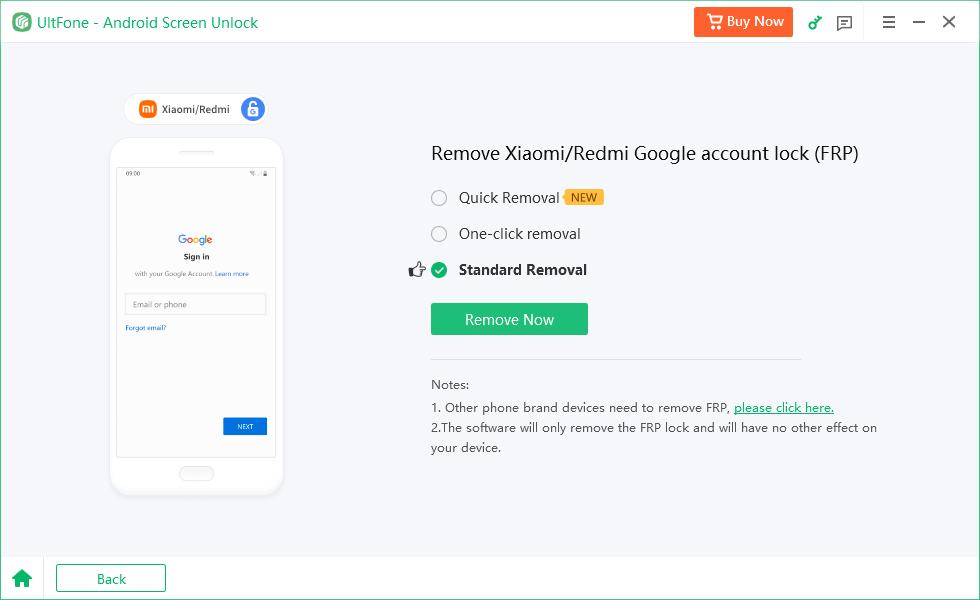
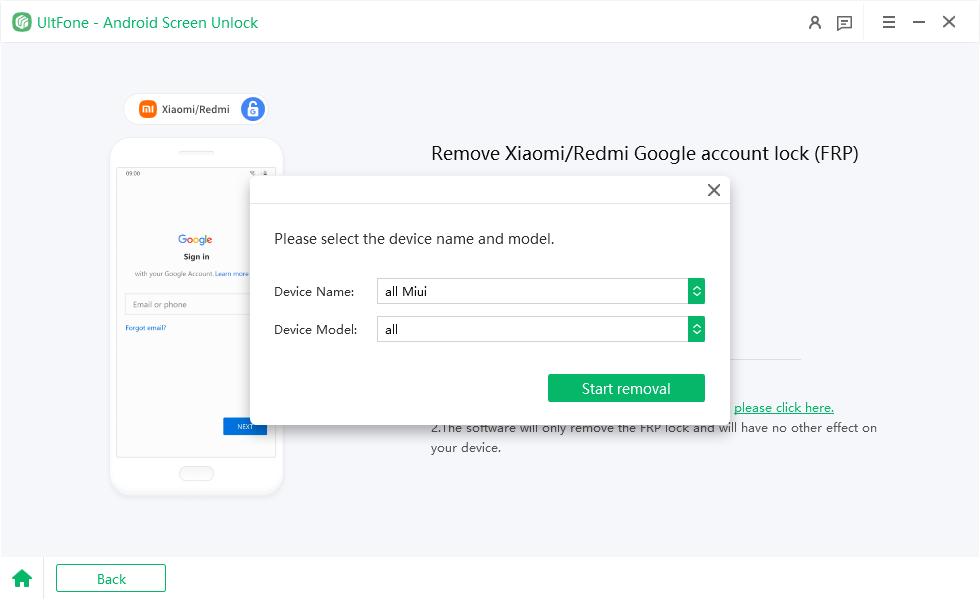
1. For all Miui devices and models
Choose the device name and device model, then click “Remove Now”. Please wait a few minutes and avoid operating the device during this process.

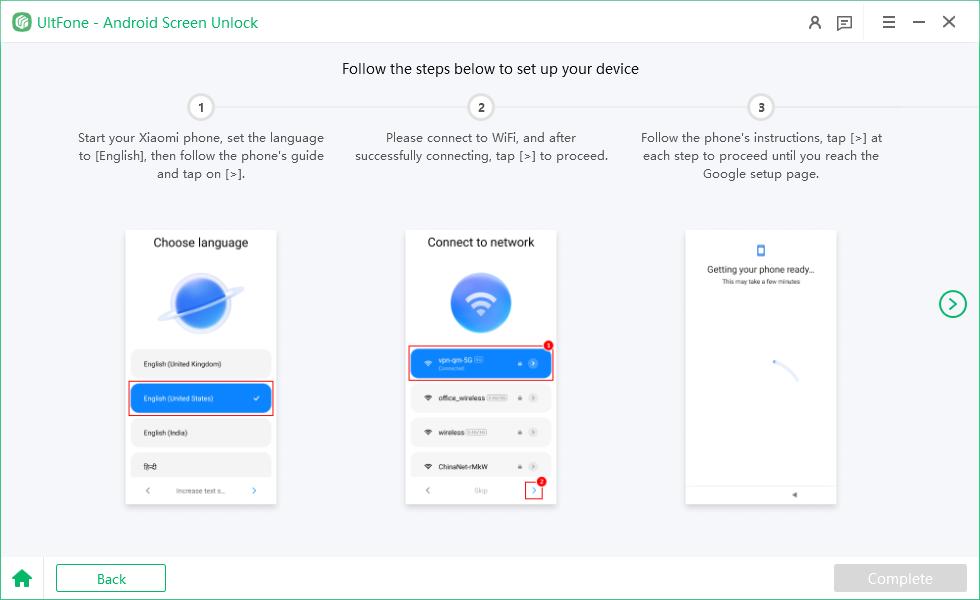
Then follow the on-screen instructions on your device to set up your device.
Then you will find the bypass is successful, and you will enter a page prompting you that Google FRP lock has been removed successfully.

2. For Redmi 8 (MIUI 11/12)
Choose the device name and device model, then click “Remove Now”. Please wait a few minutes and avoid operating the device during this process.


Then follow the on-screen instructions on your device to set up your device.
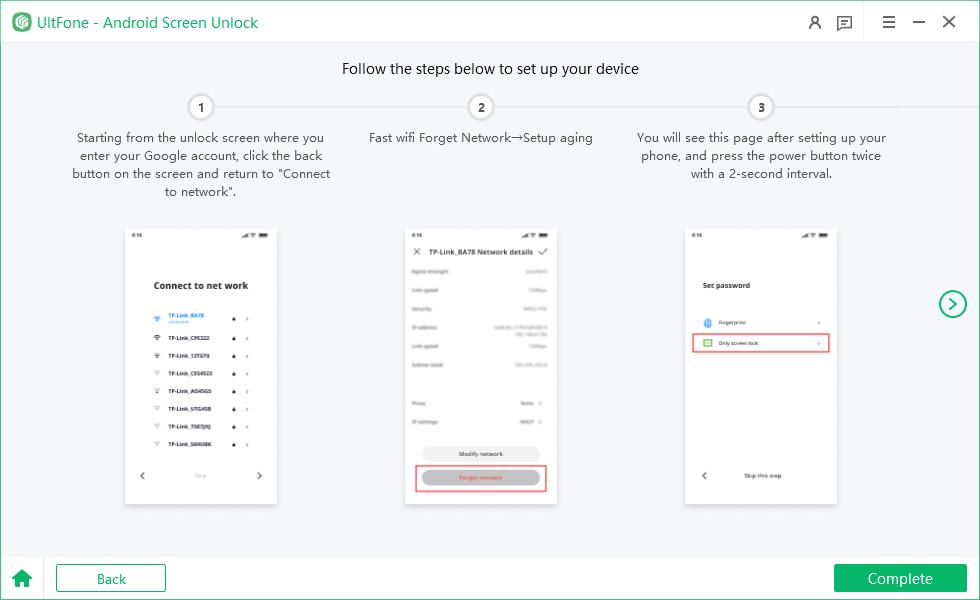
Then you will find the bypass is successful, and you will enter a page prompting you that Google FRP lock has been removed successfully.

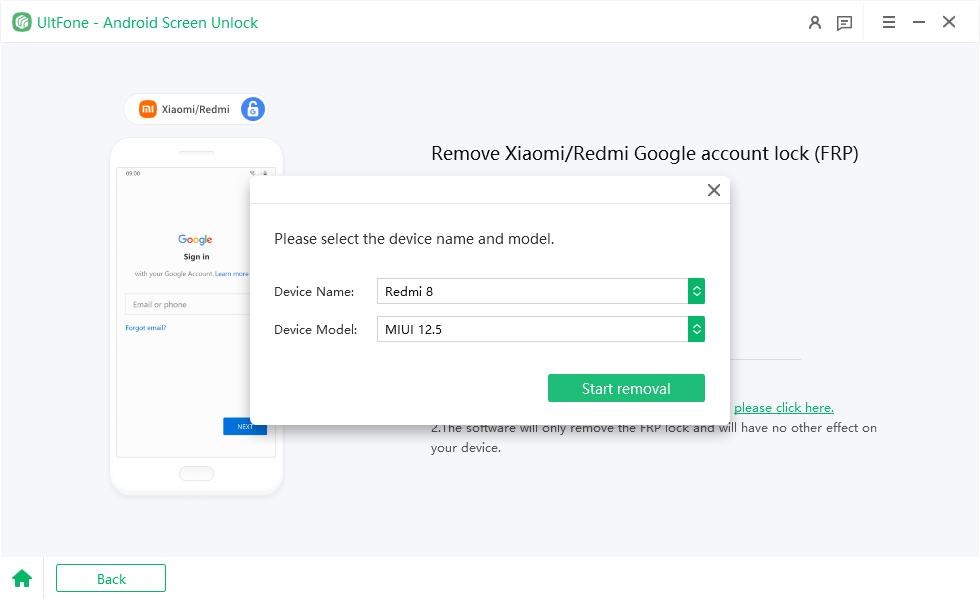
3. For Redmi 8 (MIUI 12.5)
Choose the device name and device model, then click “Remove Now”. Please wait a few minutes and avoid operating the device during this process.

Then follow the on-screen instructions on your device to set up your device.
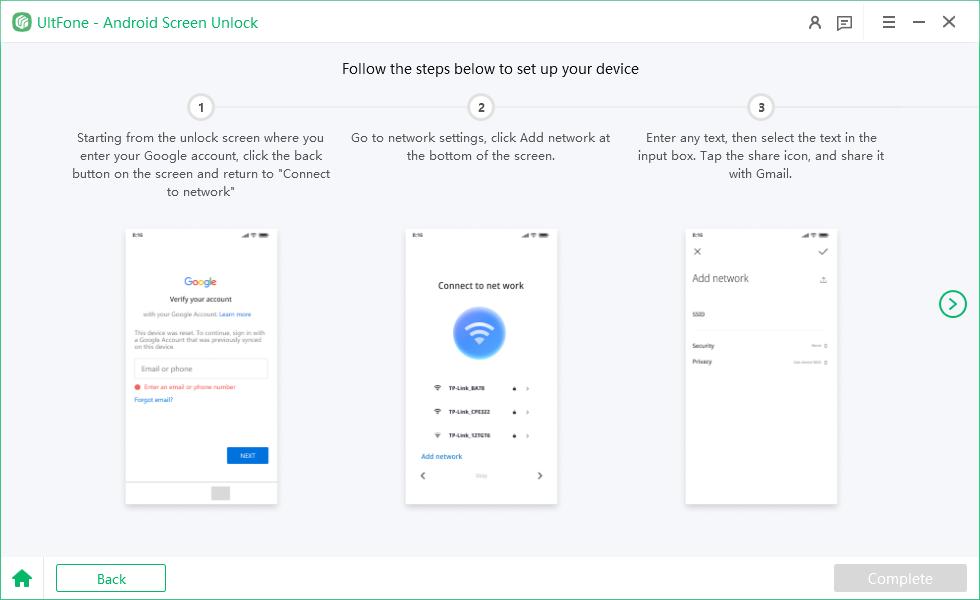
Then you will find the bypass is successful, and you will enter a page prompting you that Google FRP lock has been removed successfully.

Part 4. Remove Google Lock (FRP) from OPPO/Realme Devices
Step 1: Connect OPPO/Realme Device
After the installation is complete, connect your locked OPPO/Realme device to the computer, then choose the feature "Remove Google Lock(FRP)".

The program will automatically detect the brand of your device. Alternatively, you can also manually select the brand from the pop-up window.

Step 2: Remove OPPO/Realme FRP Lock
Remove FRP(Option A)
Select the "Remove FRP(Option A)" option and click “Remove Now” to bypass FRP on OPPO/Realme devices. Then the software will automatically install the driver.
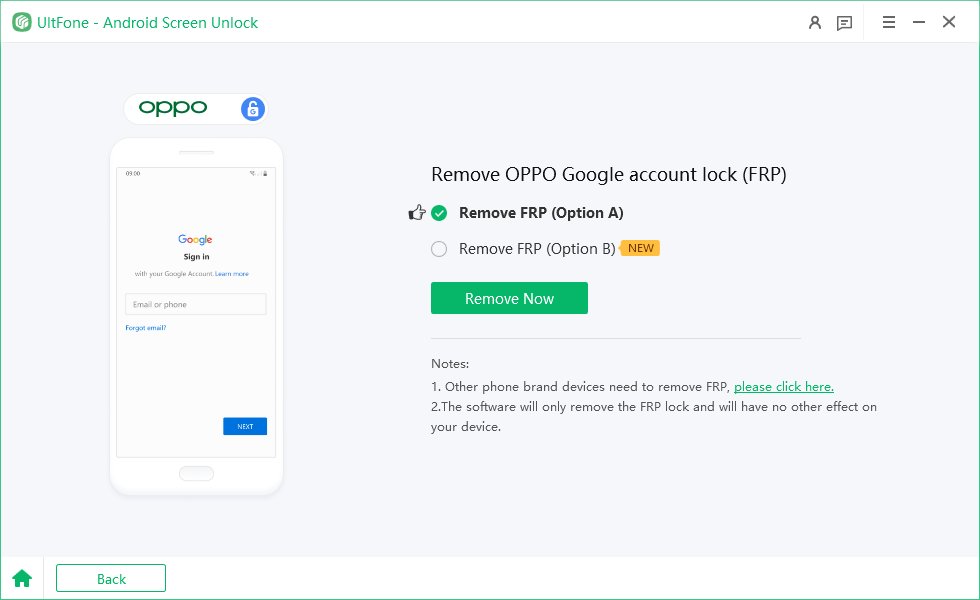

After installing the driver, follow the on-screen instructions on your device.

Once the process is completed successfully, the Google lock will be removed automatically. Please wait a few minutes and avoid operating the device during this process.

After the bypass is successful, you will enter a page prompting you that Google FRP lock has been removed successfully.

Remove FRP(Option B)
Select the "Remove FRP(Option B)" option and click “Remove Now”. The program will continue installing the driver.
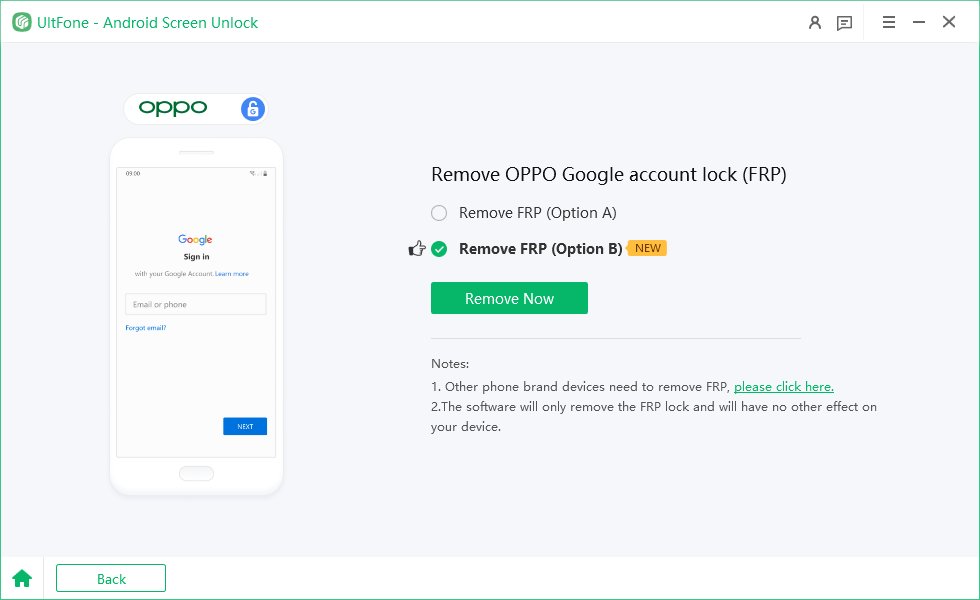

After installing the driver, follow the on-screen instructions to operate your OPPO/Realme device.
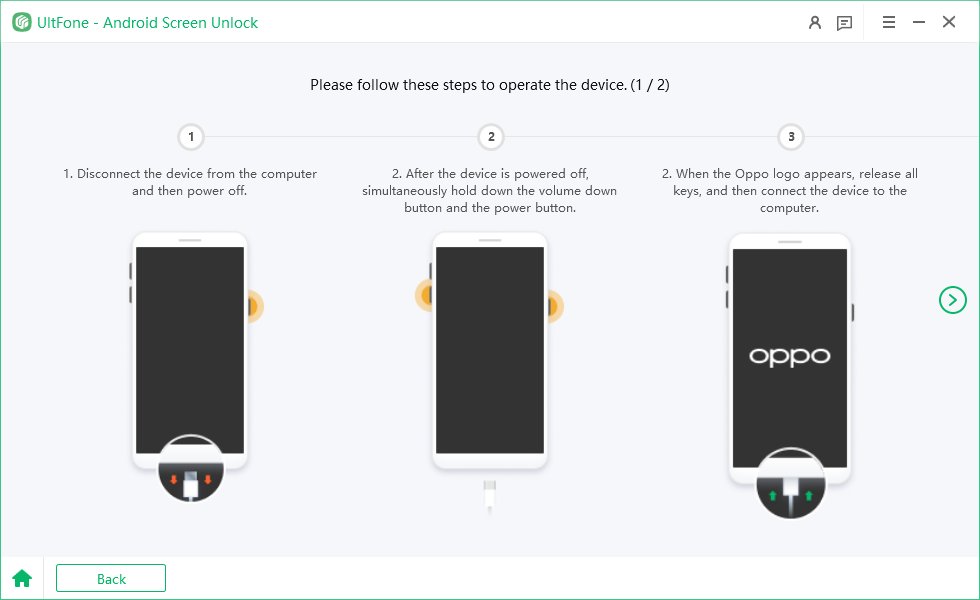
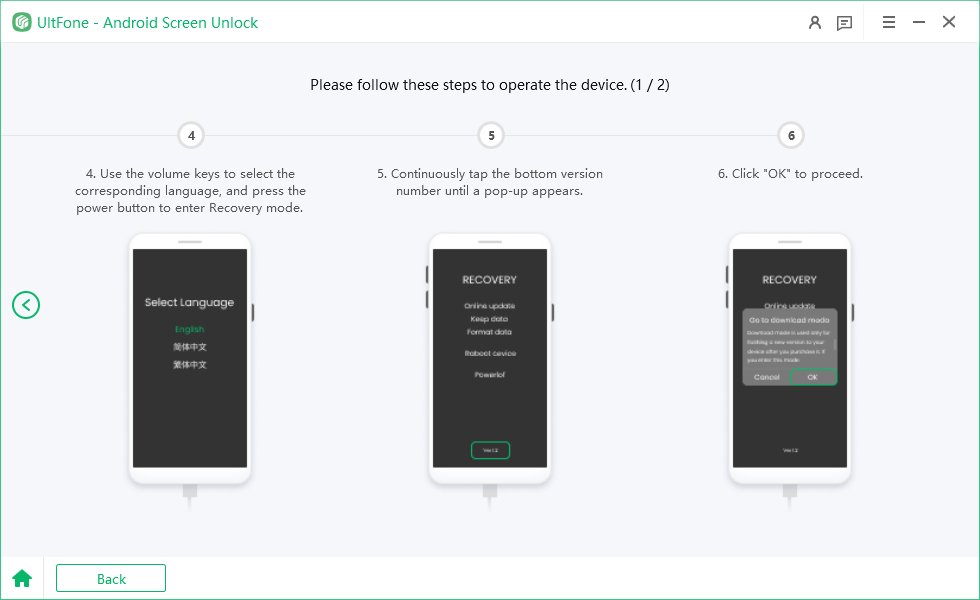
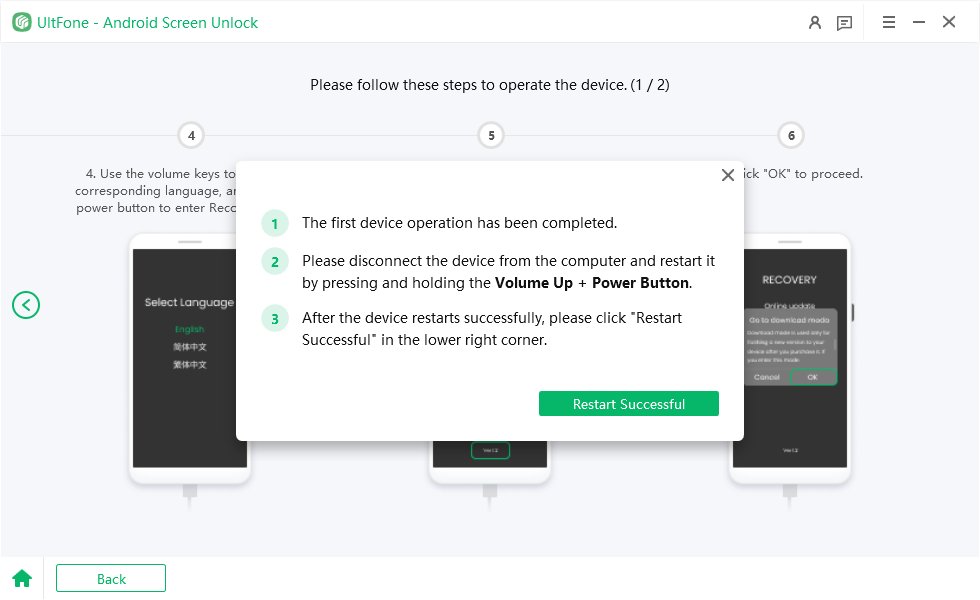
When the first operation is completed. Disconnect the device from the computer and restart it, then click "Restart Successful".
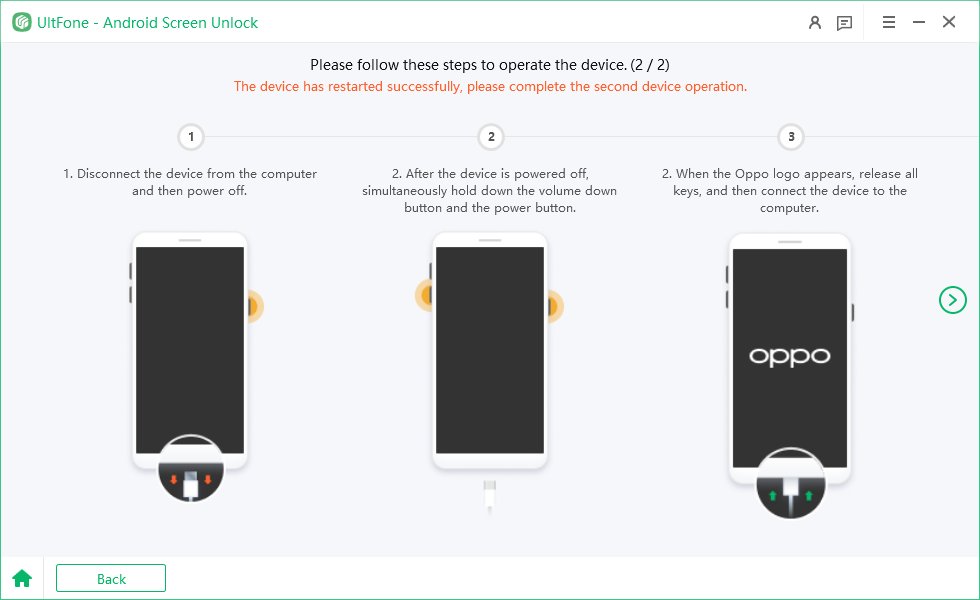
When the device has restarted successfully, complete the second operation on your OPPO/Realme.
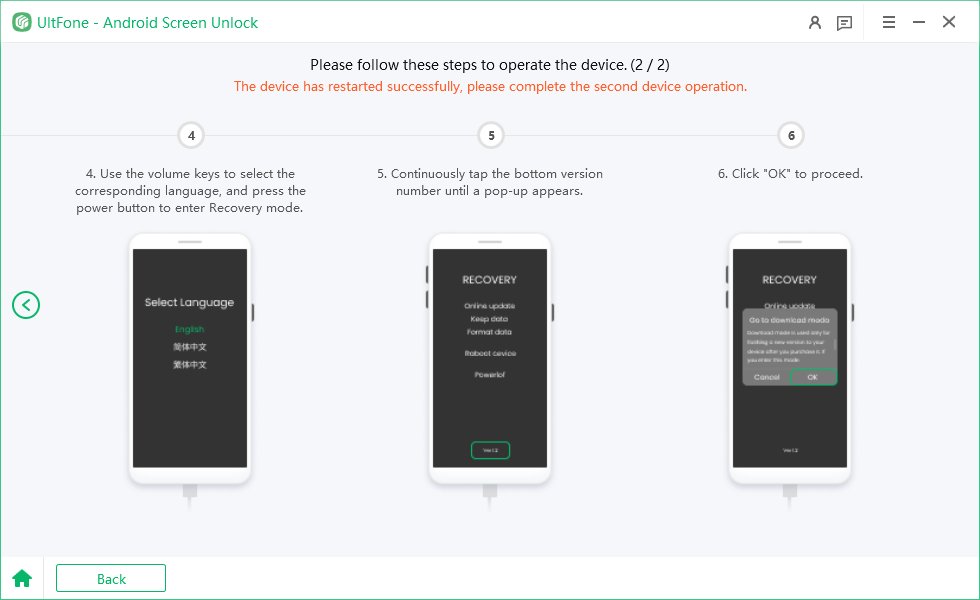
Once done, the Google lock will be removed automatically. Please wait a few minutes and avoid operating the device during this process.

Then you will find the Google FRP lock has been removed successfully.
Part 5. Remove Google Lock (FRP) from Vivo Devices
Step 1: Connect Vivo Device
After the installation is complete, connect your locked Vivo device to the computer, then choose the feature "Remove Google Lock(FRP)".

The program will automatically detect the brand of your device. Alternatively, you can also manually select the brand from the pop-up window.

Step 2: Remove Vivo FRP Lock
Click on “Remove Now” button to bypass FRP on Vivo device.
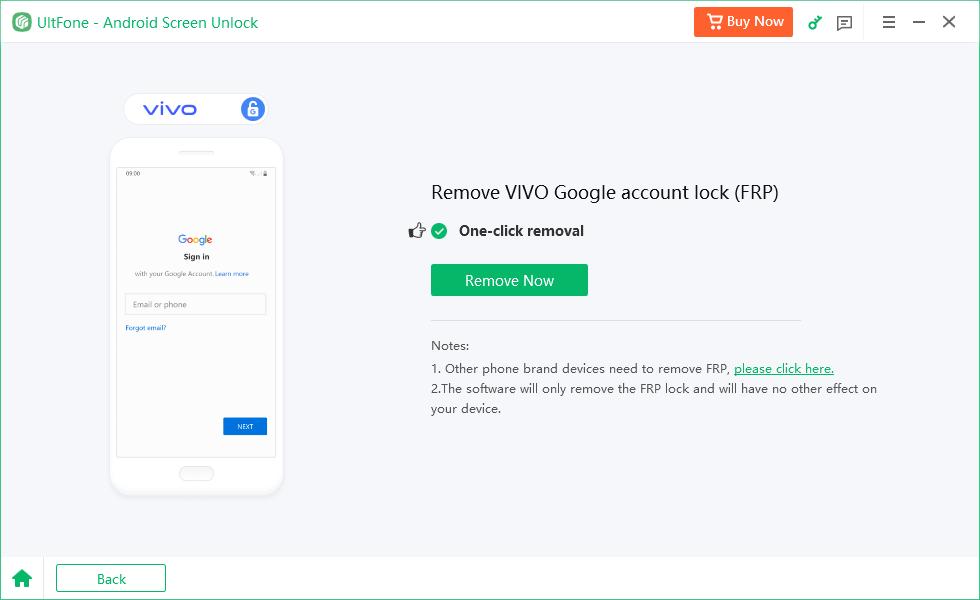
After receiving the notification on your Vivo device, follow the on-screen instructions to set up your Vivo. Click the "Next" button to continue the process.
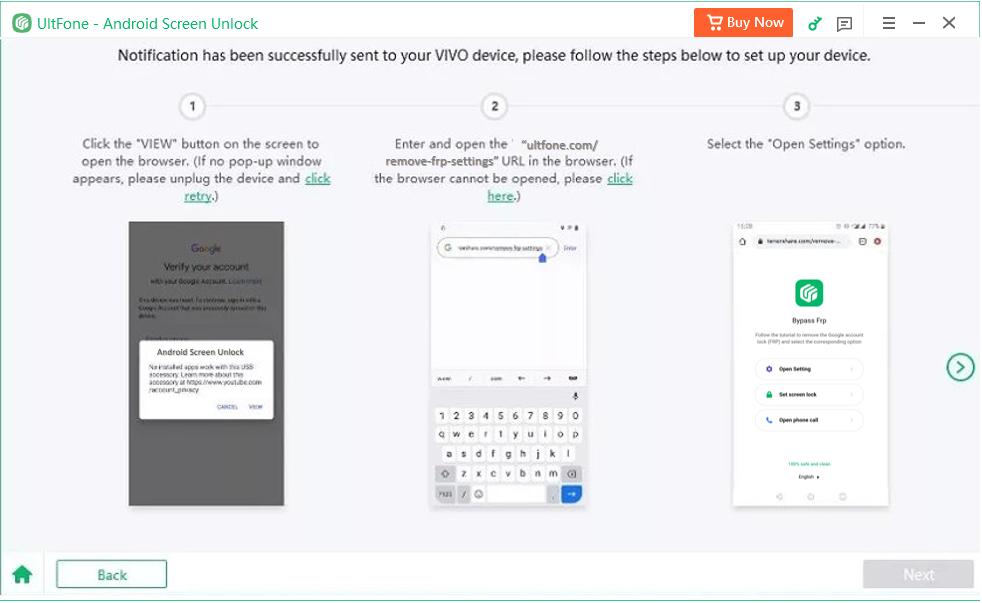

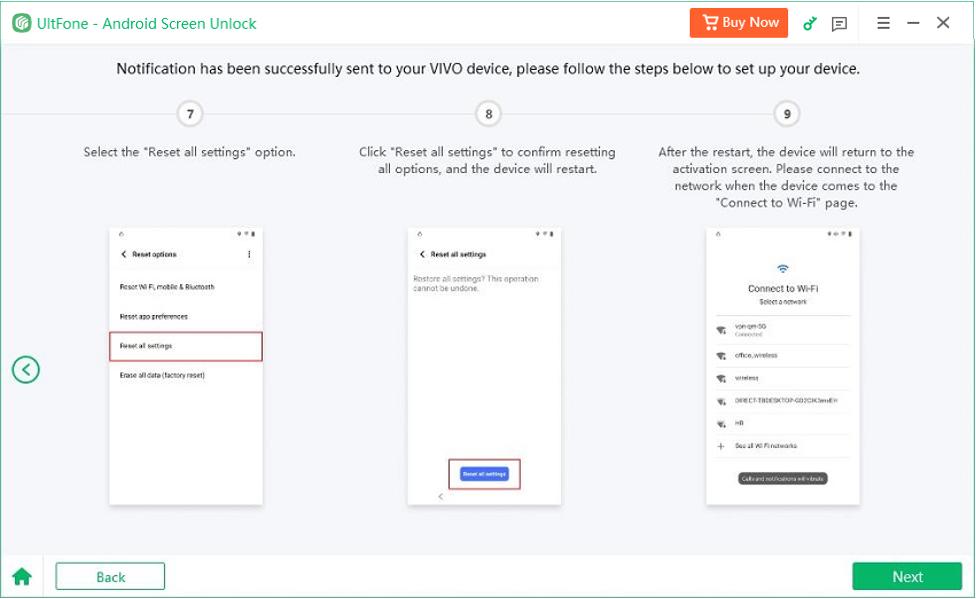
Once the process is completed successfully, the Google lock will be removed automatically. Please wait a few minutes and avoid operating the device during this process.

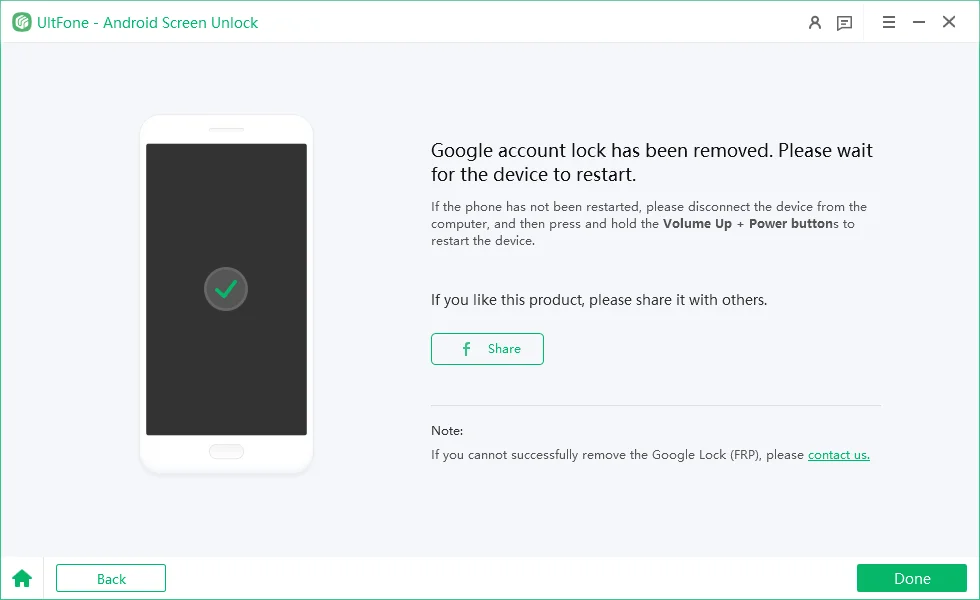
After the bypass is successful, you will enter a page prompting you that Google FRP lock has been removed successfully.

Part 6. Remove Google Lock (FRP) from OnePlus Devices
Step 1: Connect OnePlus Device
After the installation is complete, connect your locked OnePlus device to the computer, then choose the feature "Remove Google Lock(FRP)".

The program will automatically detect the brand of your device. Alternatively, you can also manually select the brand from the pop-up window.

Step 2: Remove OnePlus FRP Lock
Click on “Remove Now” button to bypass FRP on OnePlus device. Then the software will automatically install the driver.
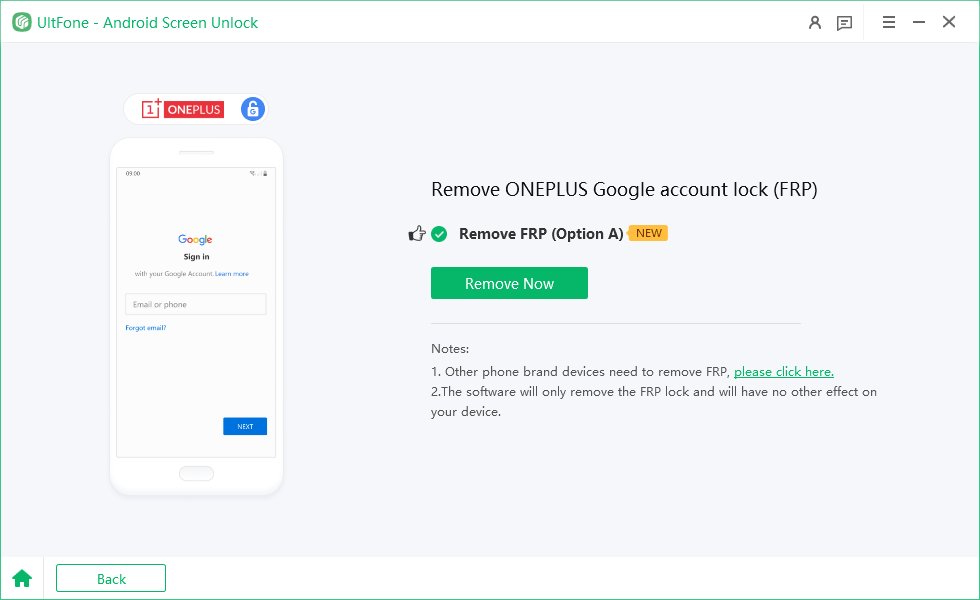

After installing the driver, follow the on-screen instructions to operate your OnePlus device.
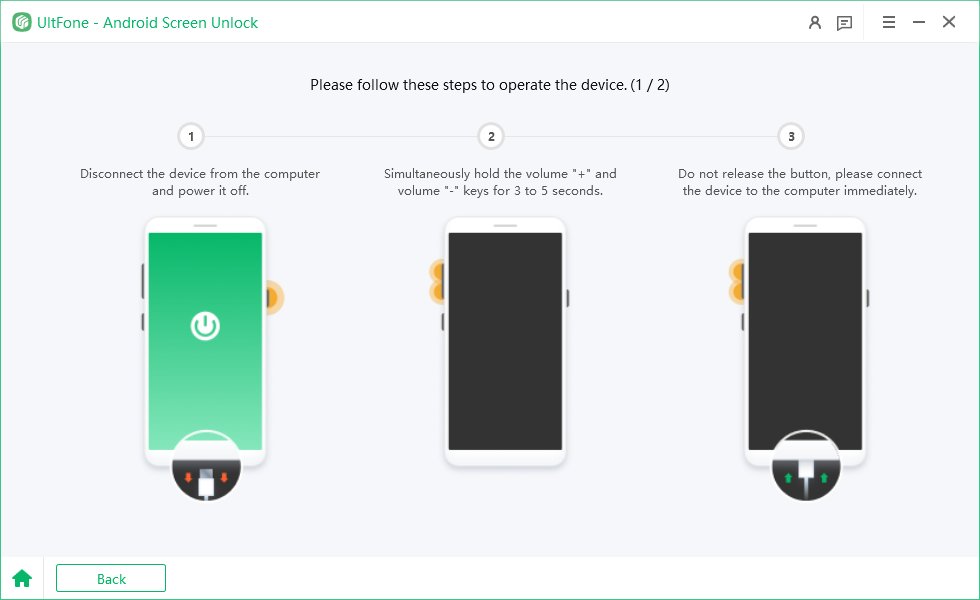
When the first operation is completed, disconnect the device and restart it, then click "Restart Successful".

When the device has restarted successfully, complete the second operation on your OnePlus.
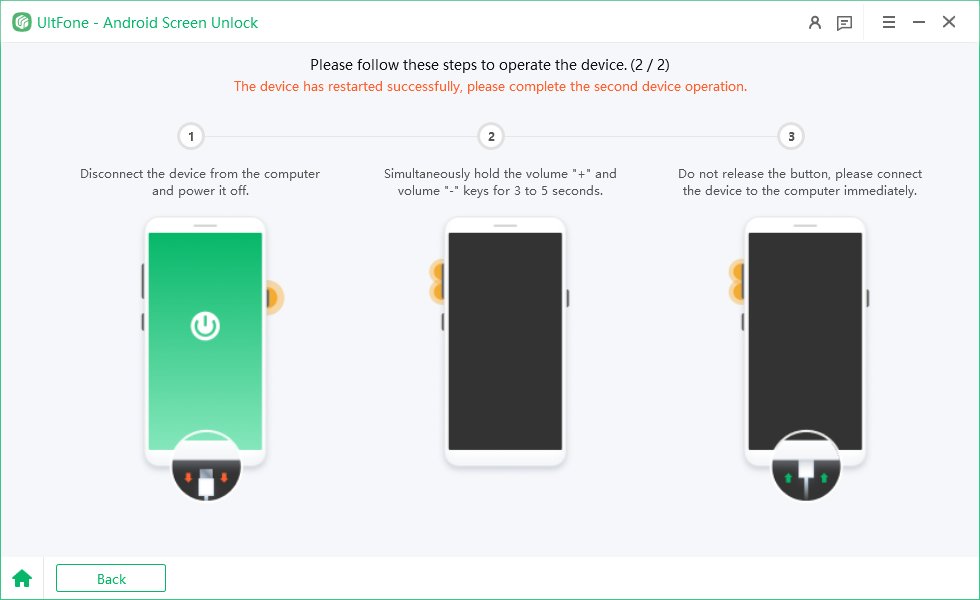
Once the process is completed successfully, the Google lock will be removed automatically. Please wait a few minutes and avoid operating the device during this process.

After the bypass is successful, you will enter a page prompting you that Google FRP lock on your OnePlus has been removed successfully.

