Want to play the world's hottest AR game Pokémon Go、Monster Hunter Now, but unfortunately it is limited in your area? Or there are times when you want to play Pokémon Go without error 12 or spoof Monster Hunter Now without walking or Third-Party softwares. UltFone iOS Location Changer is what you need. This iOS/Android GPS location spoof tool enables you to change GPS location without jailbreaking your iOS device or rooting your Android phone. You can prank your friends, match more friends on dating apps, play geo restricted games, and protect your privacy with this software now.
Here is a step by step guide on how to use this tool. Firstly, please download and install this software to your PC computer.
Part 1. One-Click to Change iOS/Android GPS Location
No matter whether you want to hide your actual location for privacy or security purposes, this software is the best choice. Let’s see how it changes the GPS location on iOS/Android devices with a simple click.
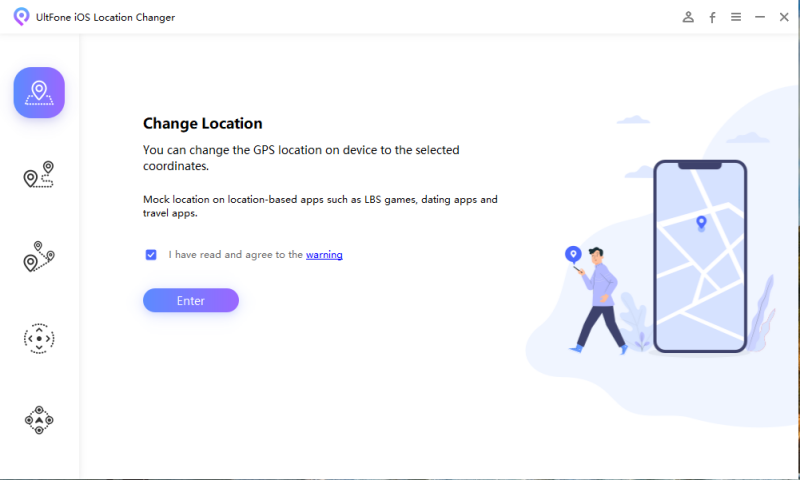
Step 1. Launch this program after installation. The default interface is the GPS change. Tick the disclaimer and click Enter button to continue.
Step 2. Select an device to be connected on the next screen.

Step 3. You can choose a location on the map with your mouse or enter the location on the top right search bar. After this, click on the “Start to Modify” button.

That is all it to change the location on your phone. All location-based apps on your iPhone/Android phone will be changed to the fake location as well.
The notes mentioned below are available on all the features.
Note 1: UltFone Game Mode
The UltFone iOS Location Changer stands out as the only spoofing tool for Windows that doesn’t rely on third-party software or modified game versions for titles like Pokémon Go or Monster Hunter Now. Users of UltFone can enjoy an impressive Pokémon capture success rate of up to 95%.

Note 2: UltFone Bluetooth Connection
Once you enter Game Mode in the UltFone iOS Location Changer, select your device (PC or phone) for automatic connection.
UltFone Bluetooth Connection for Windows Version
- For iOS 18 or lower, navigate to the Bluetooth settings page and click to connect.
- For iOS 18 and above, swipe down from the control center Bluetooth menu and tap to connect.
- If the connection fails, simply turn off Bluetooth, then turn it back on, and click to reconnect.

UltFone Bluetooth Connection for Windows Version
- Tips: Connecting to the phone first ensures your phone can find the Mac's Bluetooth. Connecting to the Mac first may result in a "Connection Failed" error.
- Connecting Phone First: First, navigate to your phone's Bluetooth settings and enable Bluetooth. Search for and select your Mac.
- Pairing Devices: On your phone, tap "Pair" first, then click "Pair" on your Mac to complete the connection.

Note 3: Cooldown time
UltFone program adds a new feature [cooldown time] for Pokemon Go players to note them not spoof location too frequently.

The cooldown time is enabled by default. You can turn it off by clicking the three-line icon on the top right corner and then choosing the “Settings”. Then, a Cooldown Period will show up.

Note 4: Restore the True Coordinate
If you want to restore the true coordinate, tap on the bottommost button in the lower right corner. Select the “Restart Now” choice on the pop-up window.
Note 5: Multi-Device
If you want to fake GPS location in no less than 1 device, tap on the first icon on the bottom right corner and then you can choose which iDevice(s) you want to spoof location.

Note 6: Historical Records
Each spoofed location will be recorded and if you want to check and use the previous location, click the star in a file icon and the locations will be shown to you. Simply click the “Use” button to use them again. Click the star button to collect the coordinate and you will find it on the “Coordinate Collection” column.

Tips
- Save your bookmarked data in the cloud and sync it across multiple devices.
- Create and name folders based on your personal needs.
- Filter saved information by route type, such as using the Multi-Spot Movement type for searches.
Part 2. How to Simulate GPS Movement between Two Spots
You can simulate a route without leaving home between two points with UltFone iOS Location Changer. Let’s see how it works.
Step 1. Connect your device to the computer and switch to the Single-Spot Movement section on the main interface. Tick the disclaimer and click “Enter” to continue. Then select the device in which you want to fake location.

Step 2. Select the start location and end location on the map or enter the location on the top right search bar.

Step 3. The single-point movement function supports multiple route navigation options of walking, cycling and driving.

Step 4. Configure the number of moves and adjust the speed by dragging the speed bar. Once set, click the "Start to move" button to travel back and forth between two points.

Step 5. You can pause and resume the movement at any time.

Step 6. You can adjust the speed during movement for a more realistic simulation.
Note: You are also allowed to import a GPX file to move based on an arranged route. Click the “GPX” icon to import a GPX file. After a while, the route will appear on the screen. You can also customize the speed and move time.

Part 3. How to Simulate GPS Move Along a Route with Multiple Spots
UltFone iOS Location Changer makes it possible to customize a route and let the GPS location move along multiple points. Here are the easy steps to set up a route with multiple spots.
Step 1. From the main interface, select the “Multi-Spot Movement”. Tick the disclaimer and click “Enter” to continue.

Step 2. You can choose Navigation Mode or Straight Mode
Option 1 Navigation Mode: Follow the GPS navigation route, adjusting according to road conditions for a more realistic experience.
- When the total straight-line distance between route nodes is less than 1000 kilometers, the walking route is used by default; when the distance is greater than 1000 kilometers, the cycling route is used.
- The maximum number of route nodes for this method is 24.
Option 2 Straight Mode: Travel in a straight line according to the set route. The maximum number of route nodes is unlimited.

Step 3. Customize your multi-point route by selecting multiple locations on the map, setting the speed, specifying the number of round trips, and then click "Start to Move" to simulate GPS movement at the customized speed.

Step 4. Enable speed adjustment during movement for a more realistic simulation experience.

Notes:
- You can expand or collapse the route list to delete one spot or adjust the coordinate.

Part 4. How to Simulate GPS Move with A Joystick
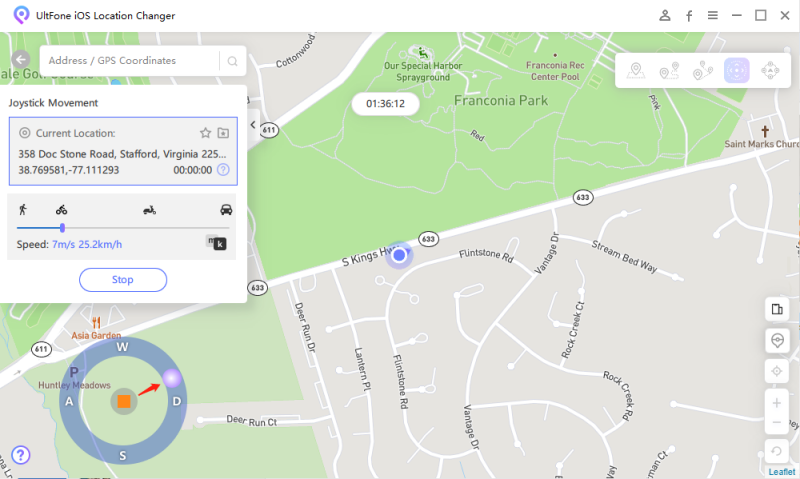
Step 1: Launch UltFone iOS Location Changer on your computer and connect your iDevice to the computer with a wireless cable. Choose the fourth icon on the left sidebar.

Step 2: Customize the speed and then drag the ball to the circle, then release it. You can change the direction 360°when moving. You can pause the movement at any time and there are 2 ways to stop the joystick movement, click the “Stop” button and tap the orange square.
Note 1: Before the joystick movement, You can also select a location on the map or enter a location on the search bar. Then, click the “Modify Positioning”.

Note 2: You can also use direction keys on your keyboard to control the direction when moving.
Part 5. How to Jump Teleport GPS Location to Custom Coordinate
Exciting Update! UltFone now boasts a brand-new feature: Jump Teleport. This feature allows you to effortlessly relocate your phone's GPS coordinates to any destination of your choice. Whether you're a Pokémon player or not, Jump Teleport empowers you to seamlessly navigate to your desired coordinates with ease.
Step 1. Select the "Jump Teleport": Begin by launching the program and connecting your device to the computer. On the home screen, locate and choose the "Jump Teleport" mode, which is the fifth option available. Once selected, click "Enter" to initiate your teleportation journey.

Step 2. Choose Destinations or Route Nodes: Now, pinpoint your desired destinations or route nodes directly on the map interface. Once you've selected your spots, click "Start to Move" to execute the teleportation between different locations seamlessly.

Note 1. Pause or Stop Jumping Anytime: If you need to halt your teleportation journey for any reason, simply click on "Pause" or "Stop" at any point during the process.

Note 2. Cooldown Time is Key in Pokémon Go: After altering your location in Pokémon Go, exercise caution. It's advisable to refrain from engaging in any in-game actions until the countdown concludes.

Note 3. Automatic Jumping After Cooldown: To streamline your teleportation process, consider activating the automatic jump feature by toggling the switch. This option allows for seamless transitions after the cooldown period elapses.

Part 6. How to Auto Scan Pokestops & Gyms
Step 1. Scan Nearby Pokestops & Gyms: Click the icon in the red circle below to initiate a scan for Pokestops and Gyms in your vicinity. Once selected, proceed by tapping "Start to Move" to choose your desired route. UltFone will then automatically scan for Pokestops and Gyms near the designated location.

Step 2. Choose a New Route Node: If the detection is complete or no game landmark is detected near the current marked location, a prompt will alert you. In response, select a new endpoint or routing node to continue.

Step 3. Clear Marked Location: To remove all marked locations, simply tap on the "Clear" icon. This action will erase all existing markings, allowing you to mark and discover new game landmarks once more.
